WAMANAGER Panel User Guide
Welcome to the WAMANAGER user guide. This comprehensive guide will walk you through all the features and functionalities available in the panel, helping you make the most of your WhatsApp Business messaging platform.
Ready to Get Started?
Access the WAMANAGER Panel to begin managing your WhatsApp Business communications.
New to the platform? Start with the Getting Started section to learn how to access the panel, configure your channel settings, and take your first steps.
What You'll Learn
- How to navigate the WAMANAGER panel
- Managing templates and broadcasts
- Organizing contacts and groups
- Using Conversation for customer conversations
- Creating and using quick replies for faster responses
- Managing media files and gallery
- Setting up automated chatbot flows
- Configuring broadcast options and settings
- Managing users and permissions
- Configuring settings and preferences
Getting Started
Welcome to the WAMANAGER! This section will guide you through the initial setup and help you get started with using the platform.
Accessing the WAMANAGER Panel
To access the WAMANAGER Panel, you need to log in with your credentials.
Steps to Access:
- Navigate to the WAMANAGER Panel login page
- Enter your email address and password
- Click "Login" to access your dashboard
- If you have multiple tenants, select the appropriate tenant from the list
Note: If you forget your password, use the "Forgot Password" link on the login page to reset it. If you're already logged in, you can go directly to the dashboard.
Initial Channel Setting
Before you can start using the platform, you need to configure your WhatsApp Business API credentials for each channel. The Channel Setting allows you to manage credentials separately for each communication channel, giving you flexibility to use different WhatsApp Business accounts for different channels.
Channel-Wise Credential Management:
Each channel can have its own set of credentials, allowing you to:
- Configure separate WhatsApp Business accounts for different channels
- Manage credentials independently for each channel
- Expand or collapse channel settings for easy navigation
- See which channels have pending settings (marked with a "Pending" badge)
- Update individual channel credentials without affecting others
Required Information for Each Channel:
For each channel, you'll need the following information from your WhatsApp Business API setup:
- Phone Number ID: Your WhatsApp Business phone number identifier
- App ID: Your Meta App ID
- App Secret: Your Meta App Secret
- WABA ID: WhatsApp Business Account ID
- Access Token: Your API access token (keep this secure)
- Verify Token: Token for webhook verification
- External API Token: Additional API token (can be generated automatically)
- Company Name: Your business or company name
1. Get WhatsApp Api credentials and Access Token
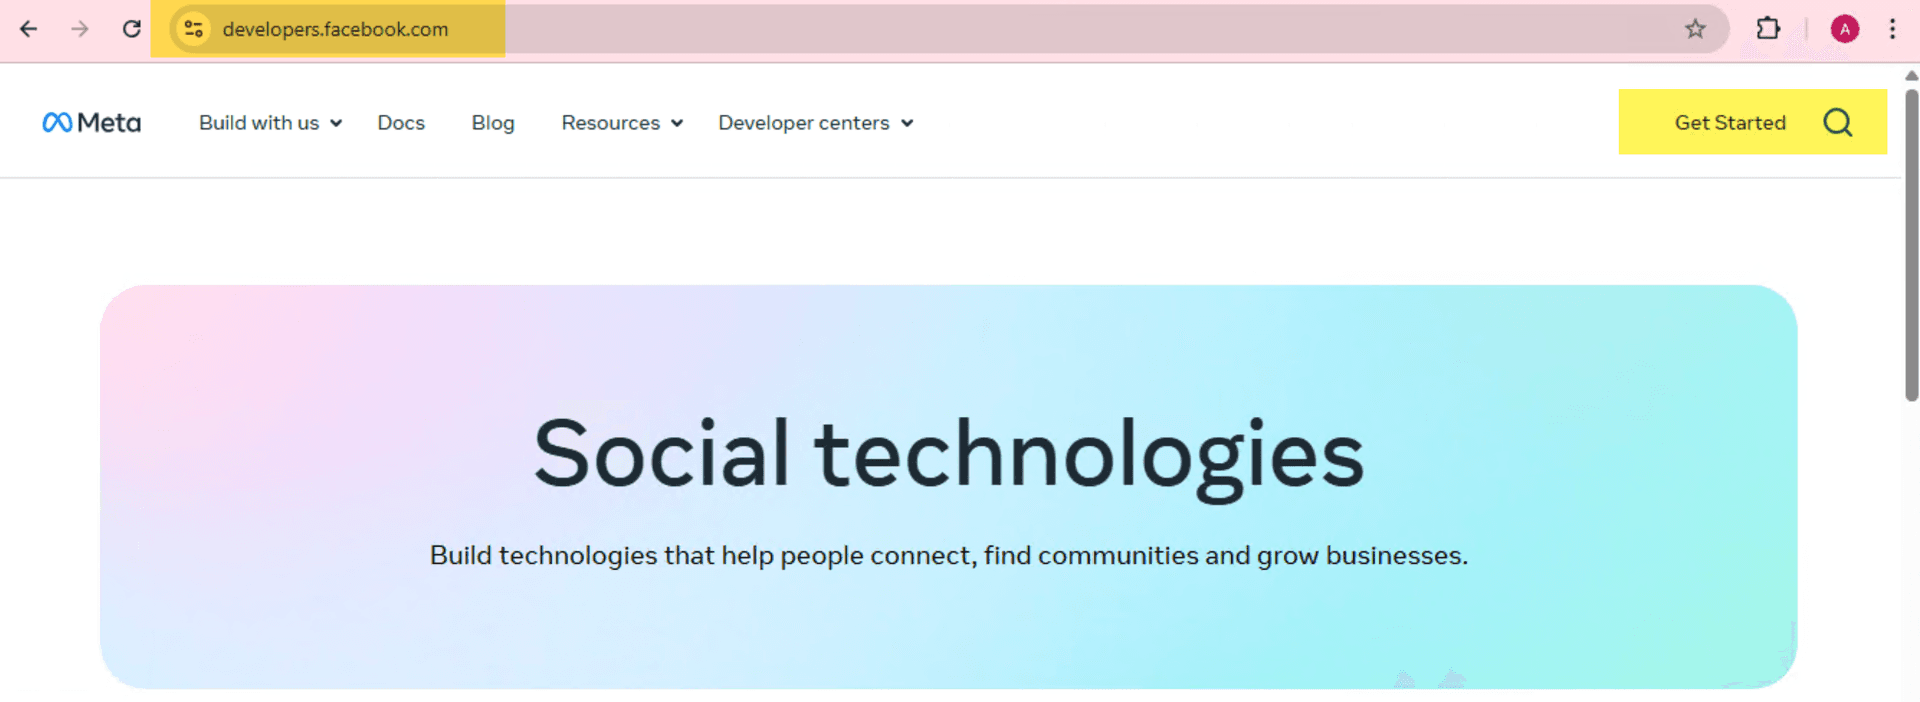
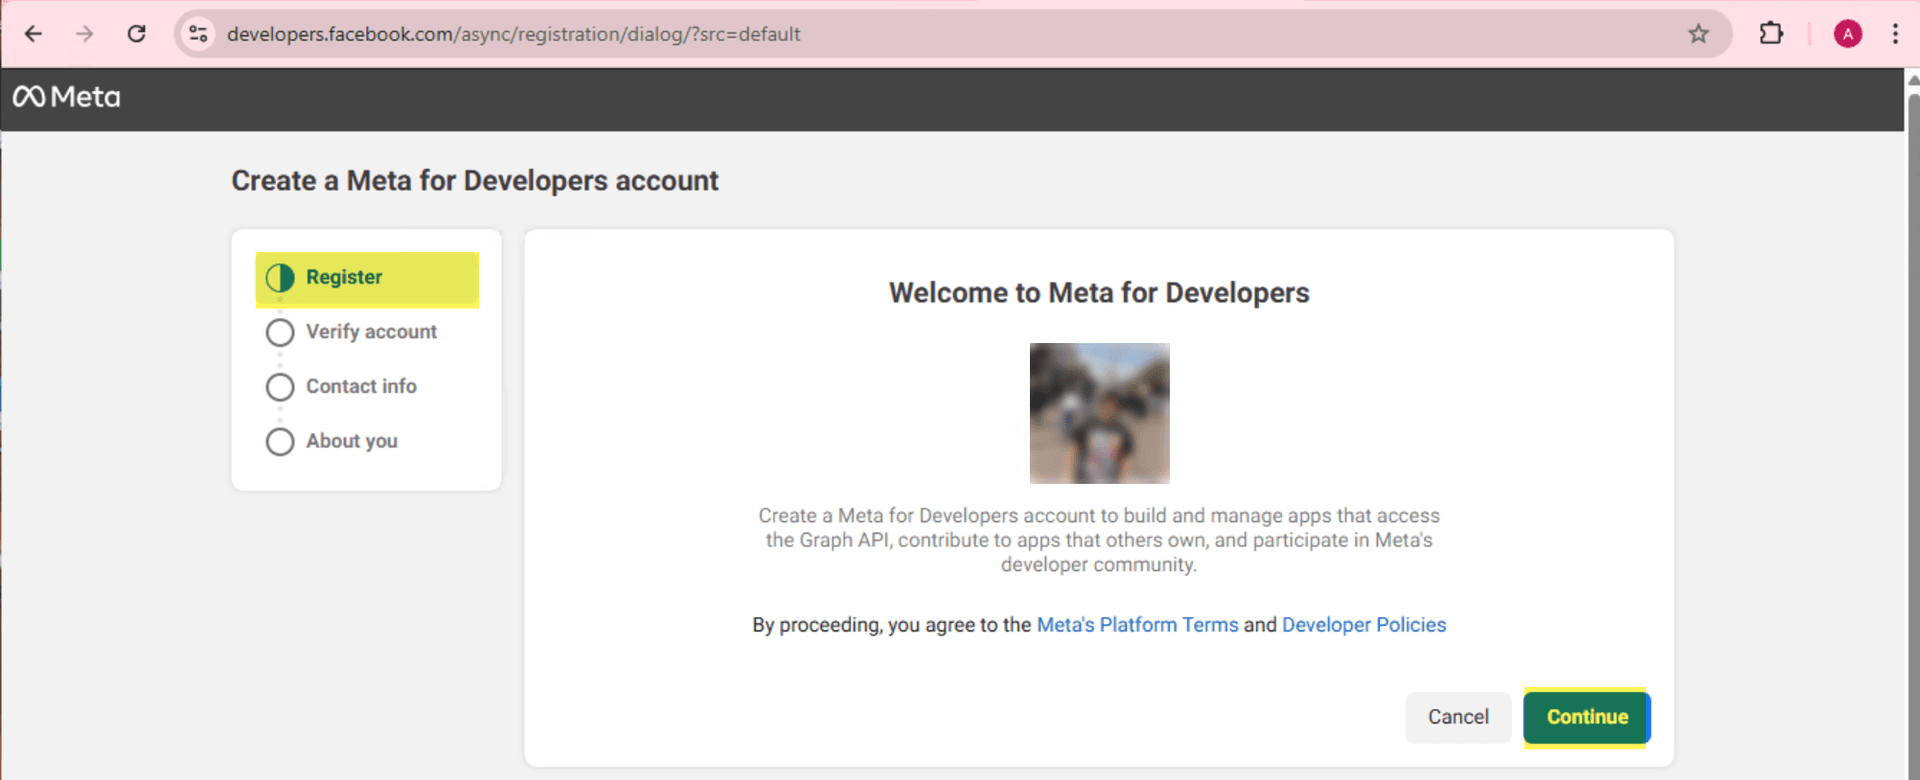
- Go to Meta for DevelopersGet Started or Login.
- Log in to your Meta account, or create a new Meta Developer account if you don't have one.Register → Click on continue
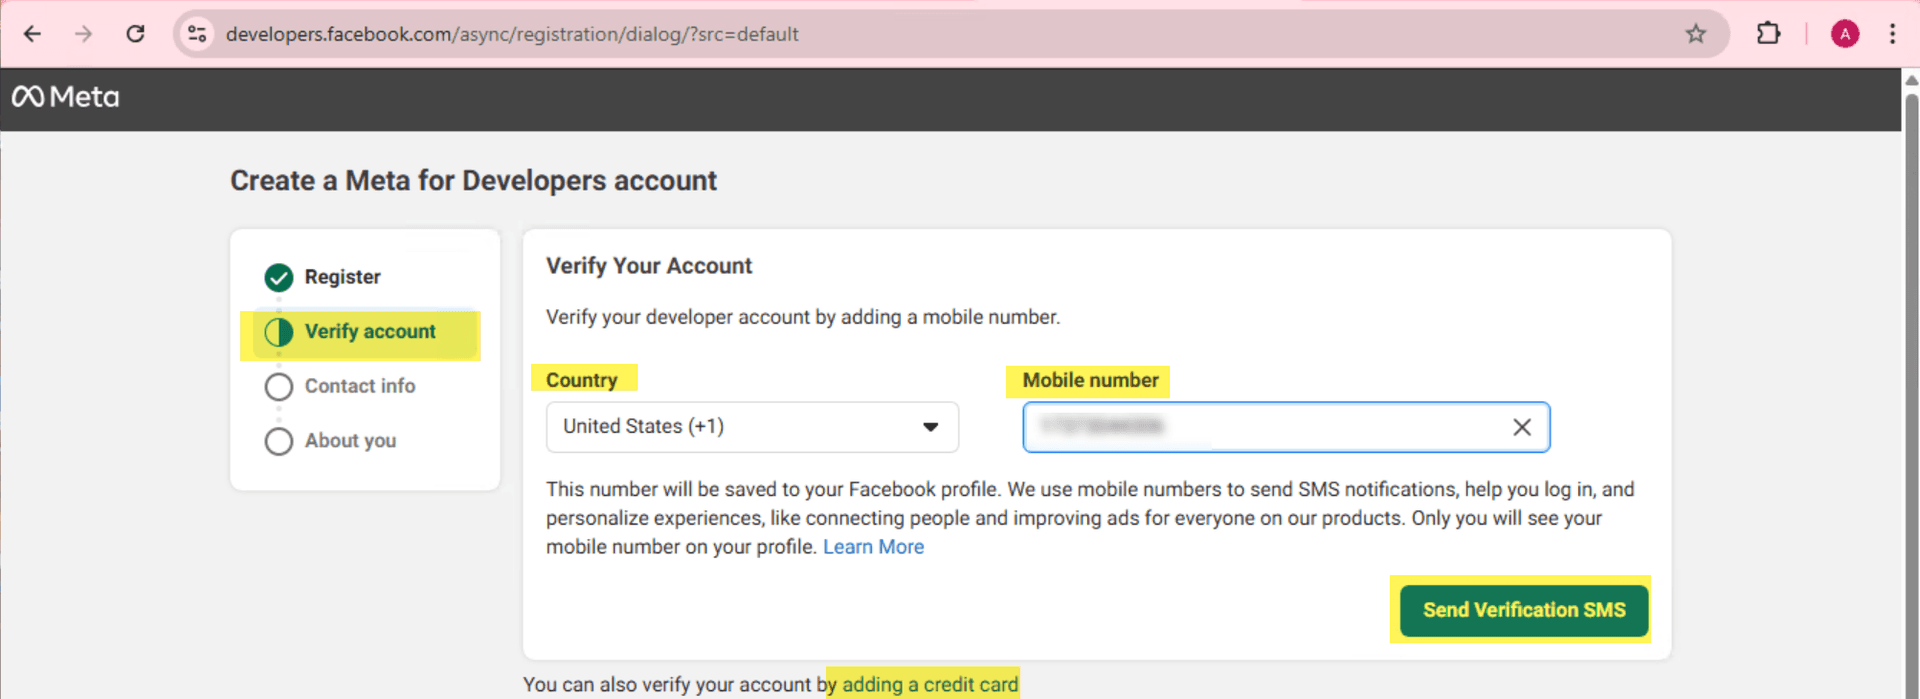
- Verify your developer account by adding a mobile number or You can also verify your account by adding a credit card.Verify Account → Select Country code → Add Mobile number → Verify
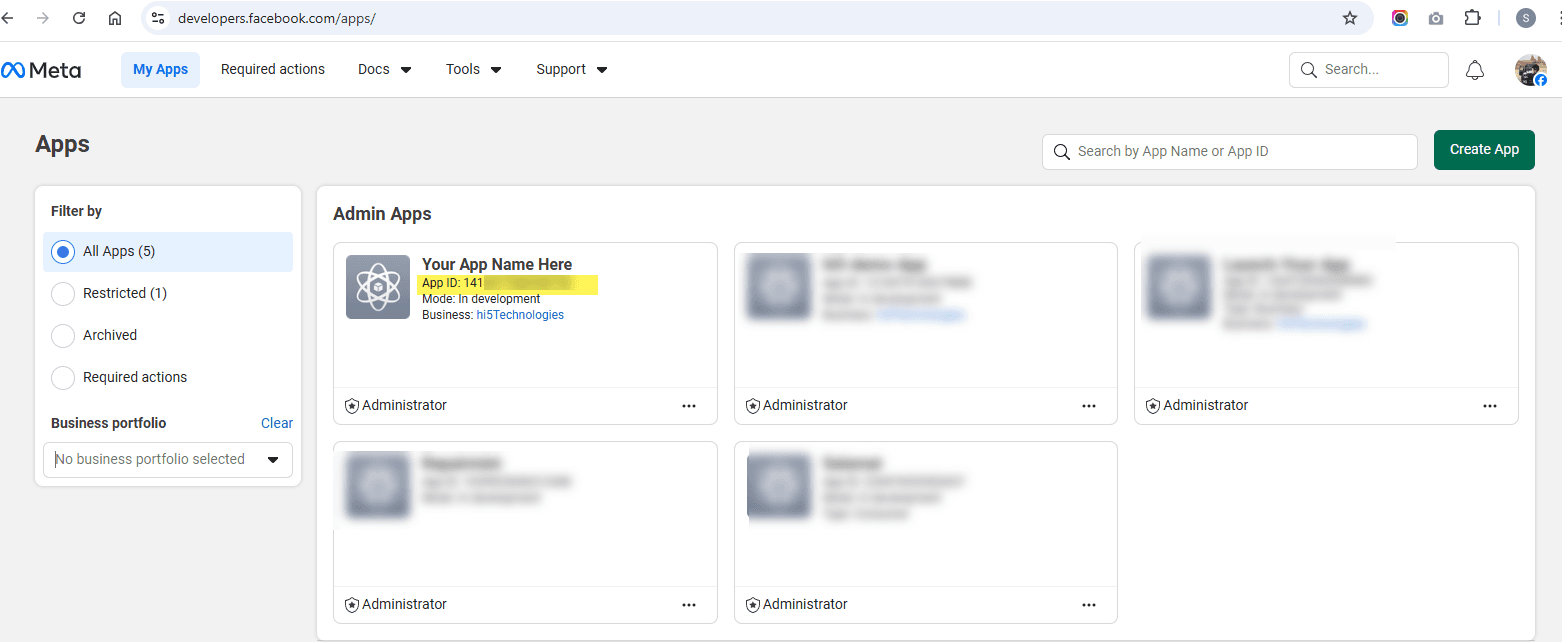
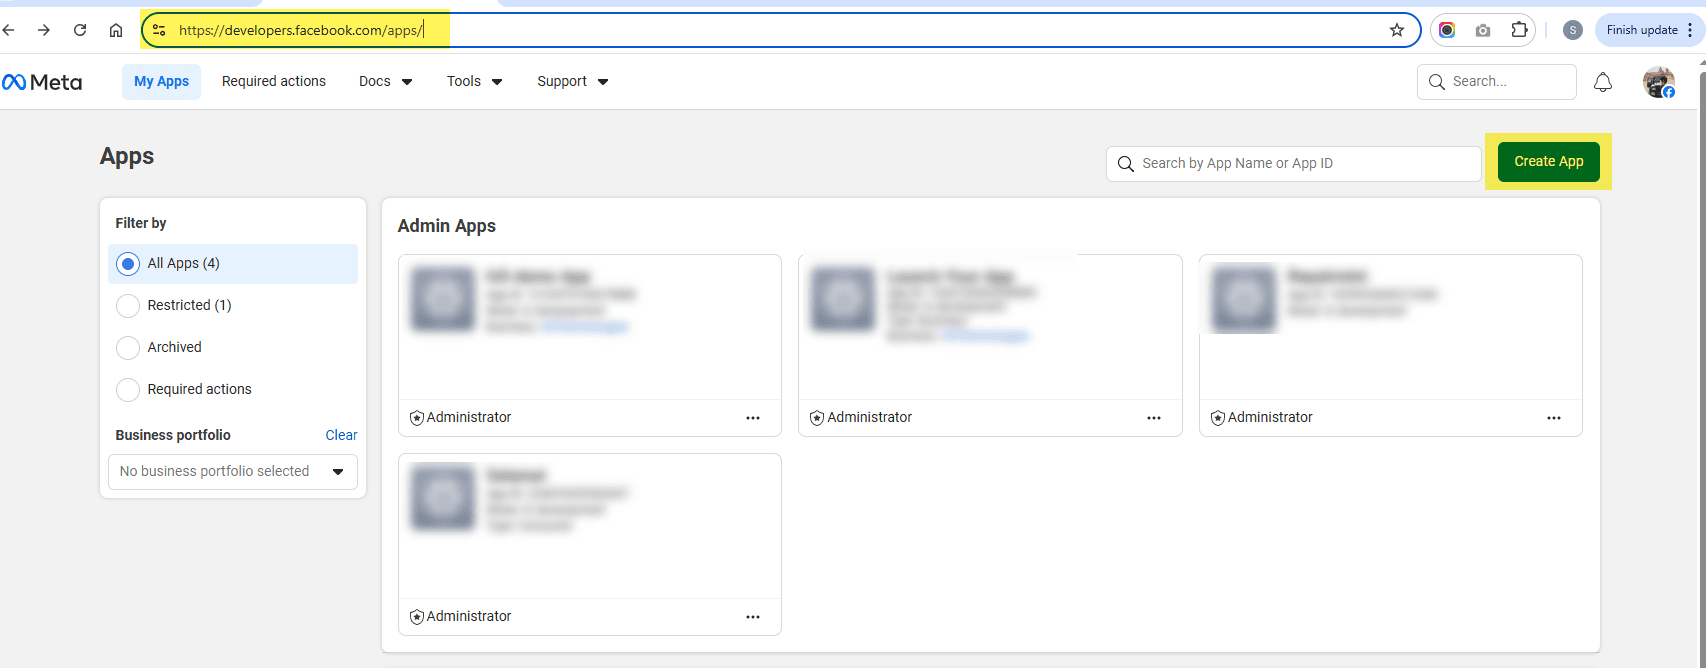
- Visit https://developers.facebook.com/apps/ and create a new app that will be used with WAMANAGER.Click "Create App" → Select app type
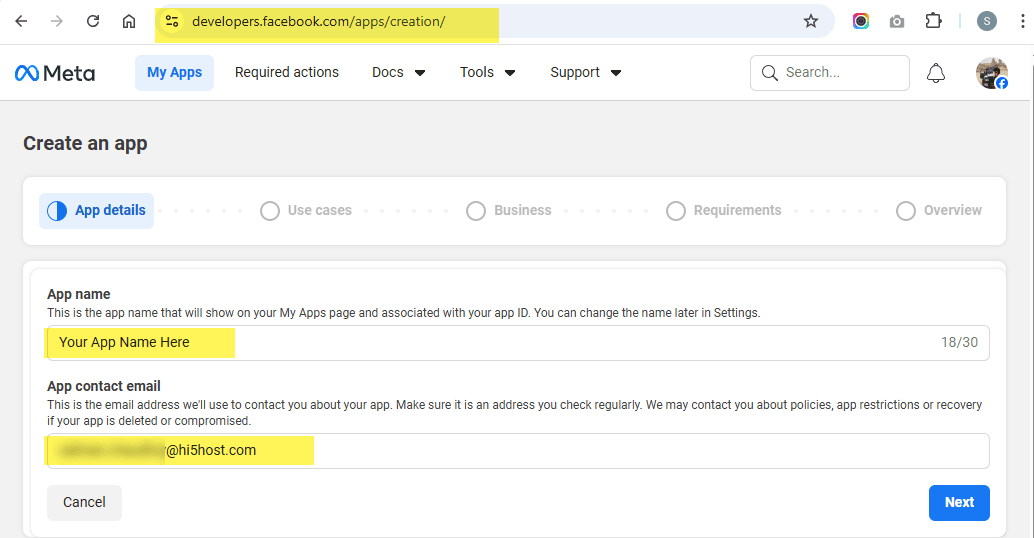
- Enter the app details.Fill in app name and contact email → Create
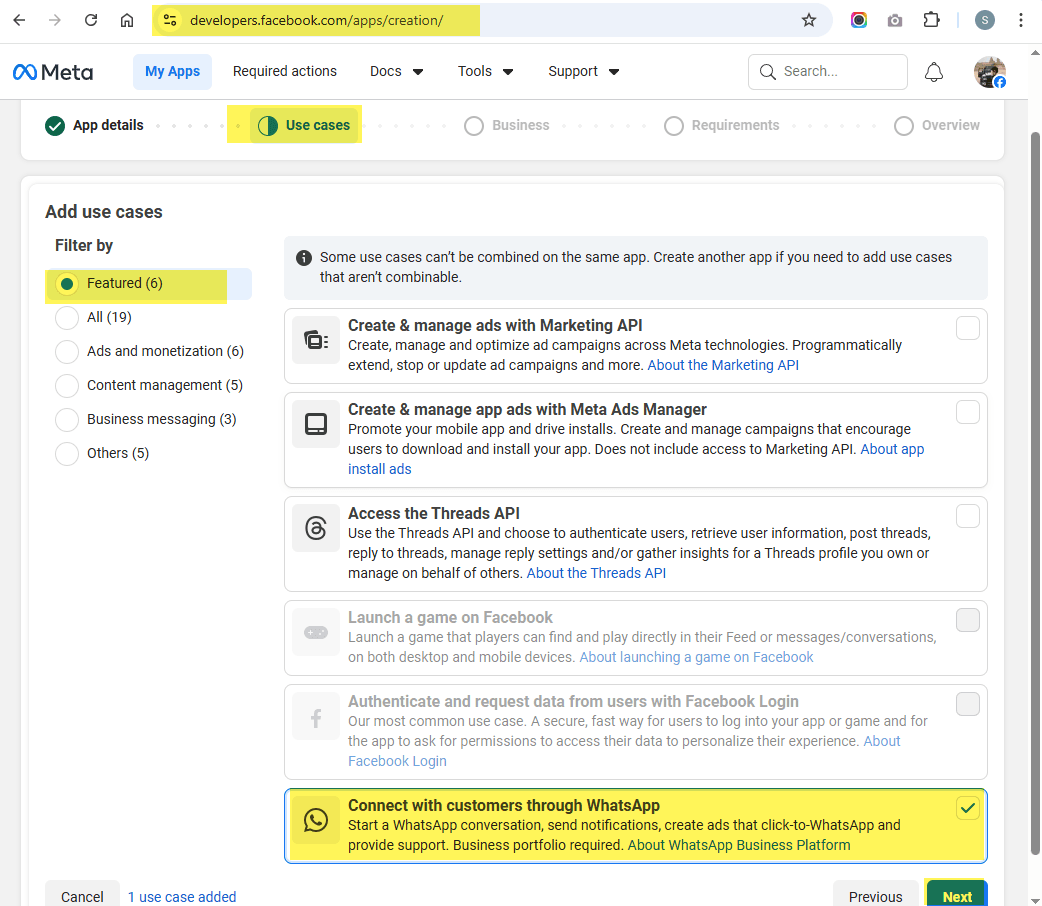
- Select the Use Case and choose the option "Connect with customers through WhatsApp".Featured → Select "Connect with customers through WhatsApp" → Next
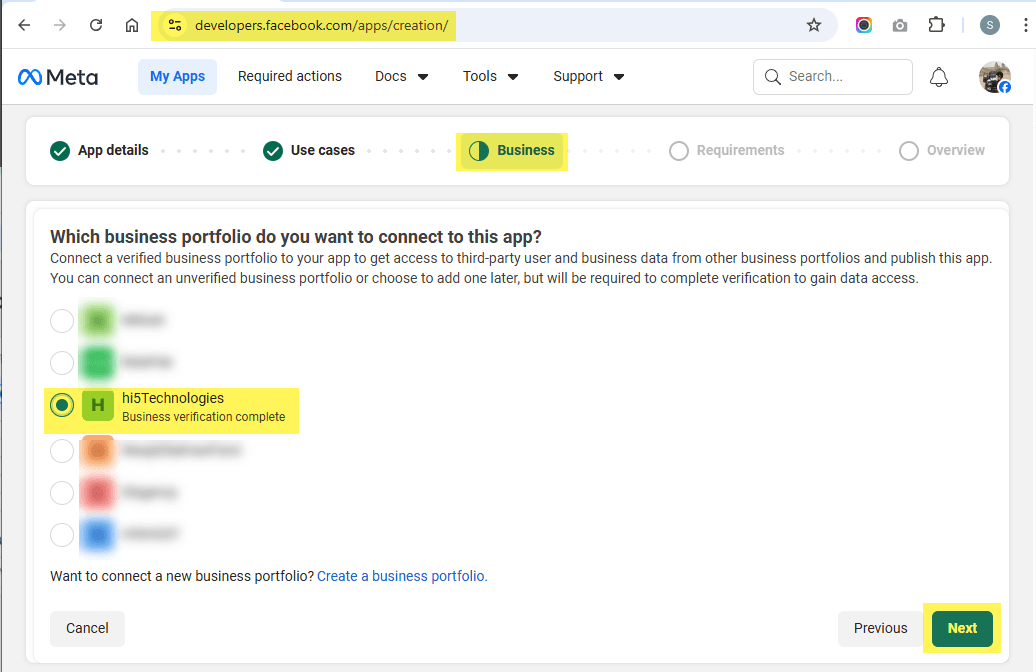
- Select a META verified business portfolio to connect without using your app.Select your business portfolio → Next
- Check for any publishing requirements, or proceed to the next step.Review requirements → Next
- Review the overview details and navigate to the Dashboard.Review details → Go to Dashboard
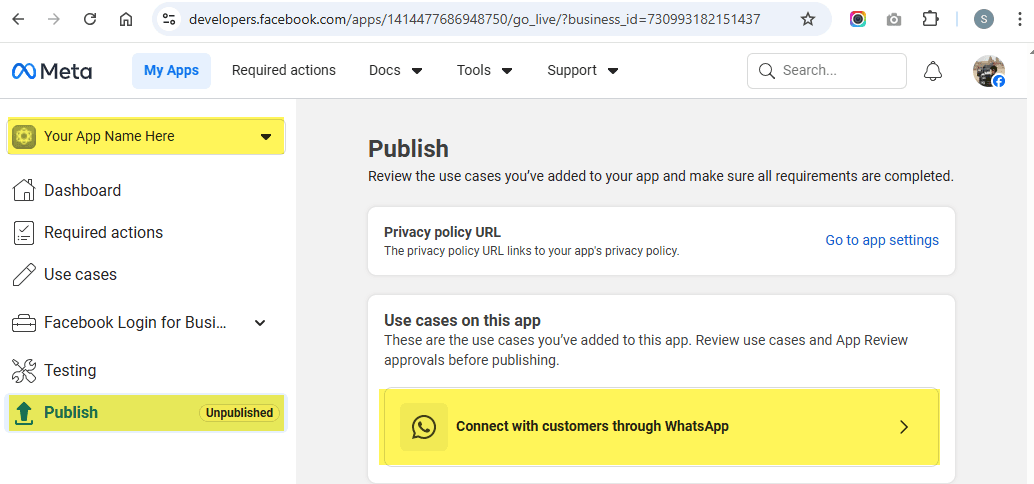
- Click on Connect with "Customer through Whatsapp".Publish → Click "Connect with Customer through Whatsapp"
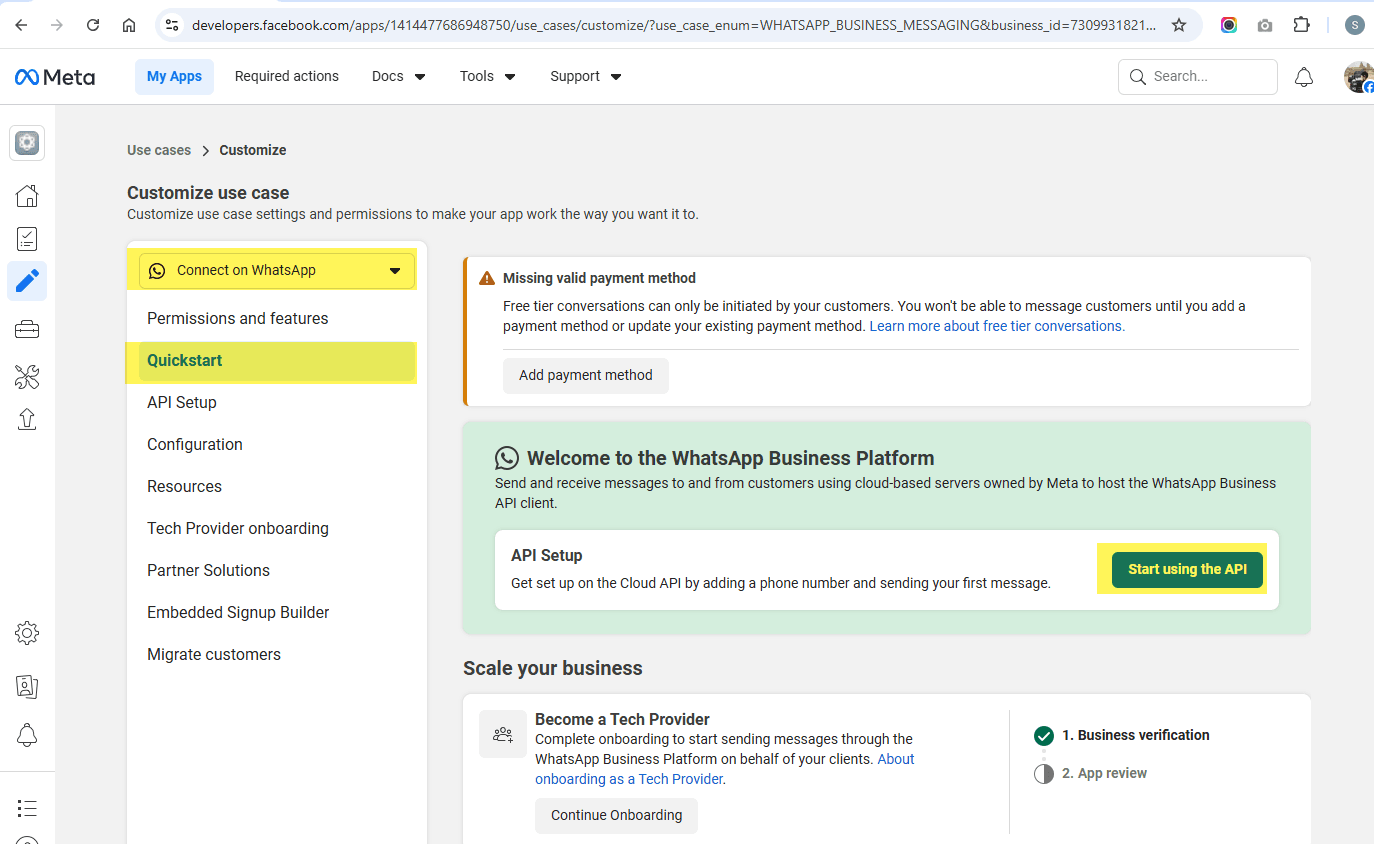
- Add the missing payment method, if it has not already been added.Connect on WhatsApp → Quickstart → Add payment method if required
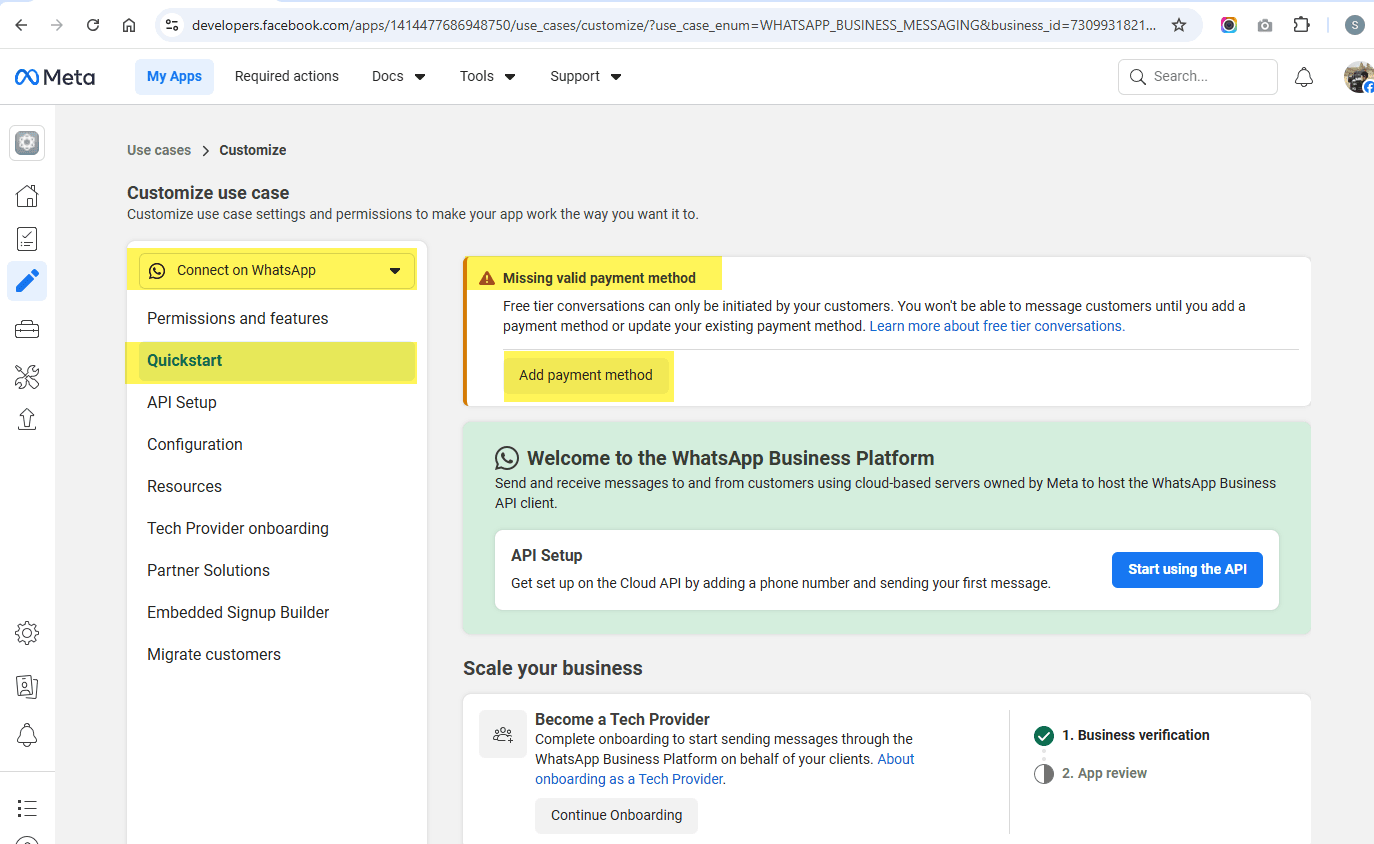
- 11.1Visit https://business.facebook.com/ , go to Settings → WhatsApp Accounts, select the app for which you want to add a payment method, click Payment Settings, and follow the steps to add the payment.Settings → WhatsApp Accounts → Select app → Payment Settings → Add payment

- 11.1Visit https://business.facebook.com/ , go to Settings → WhatsApp Accounts, select the app for which you want to add a payment method, click Payment Settings, and follow the steps to add the payment.
- Click on "Start Using the API".Connect on WhatsApp → Quickstart → Click "Start Using the API" button
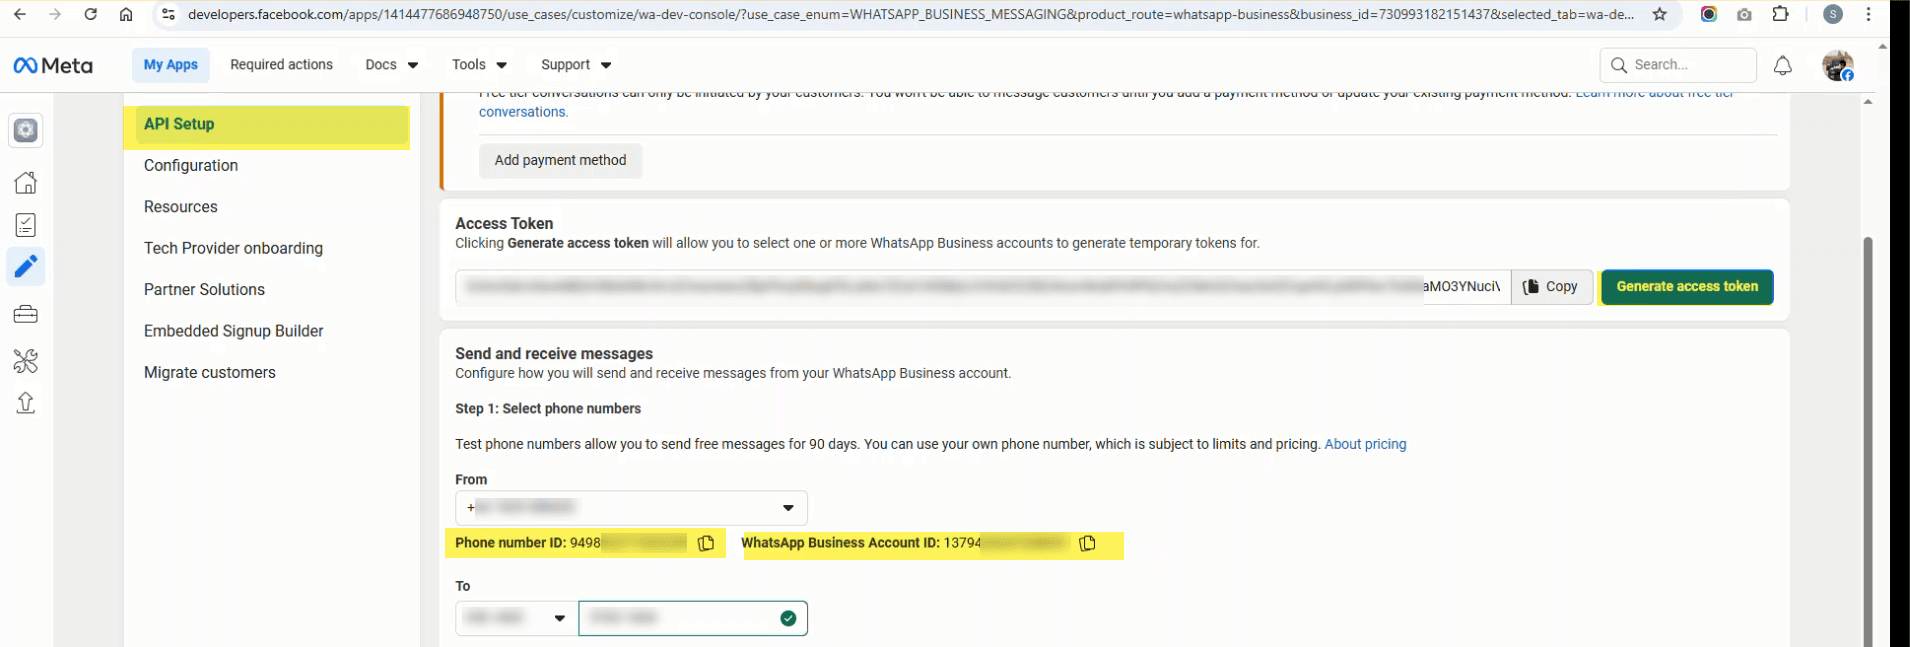
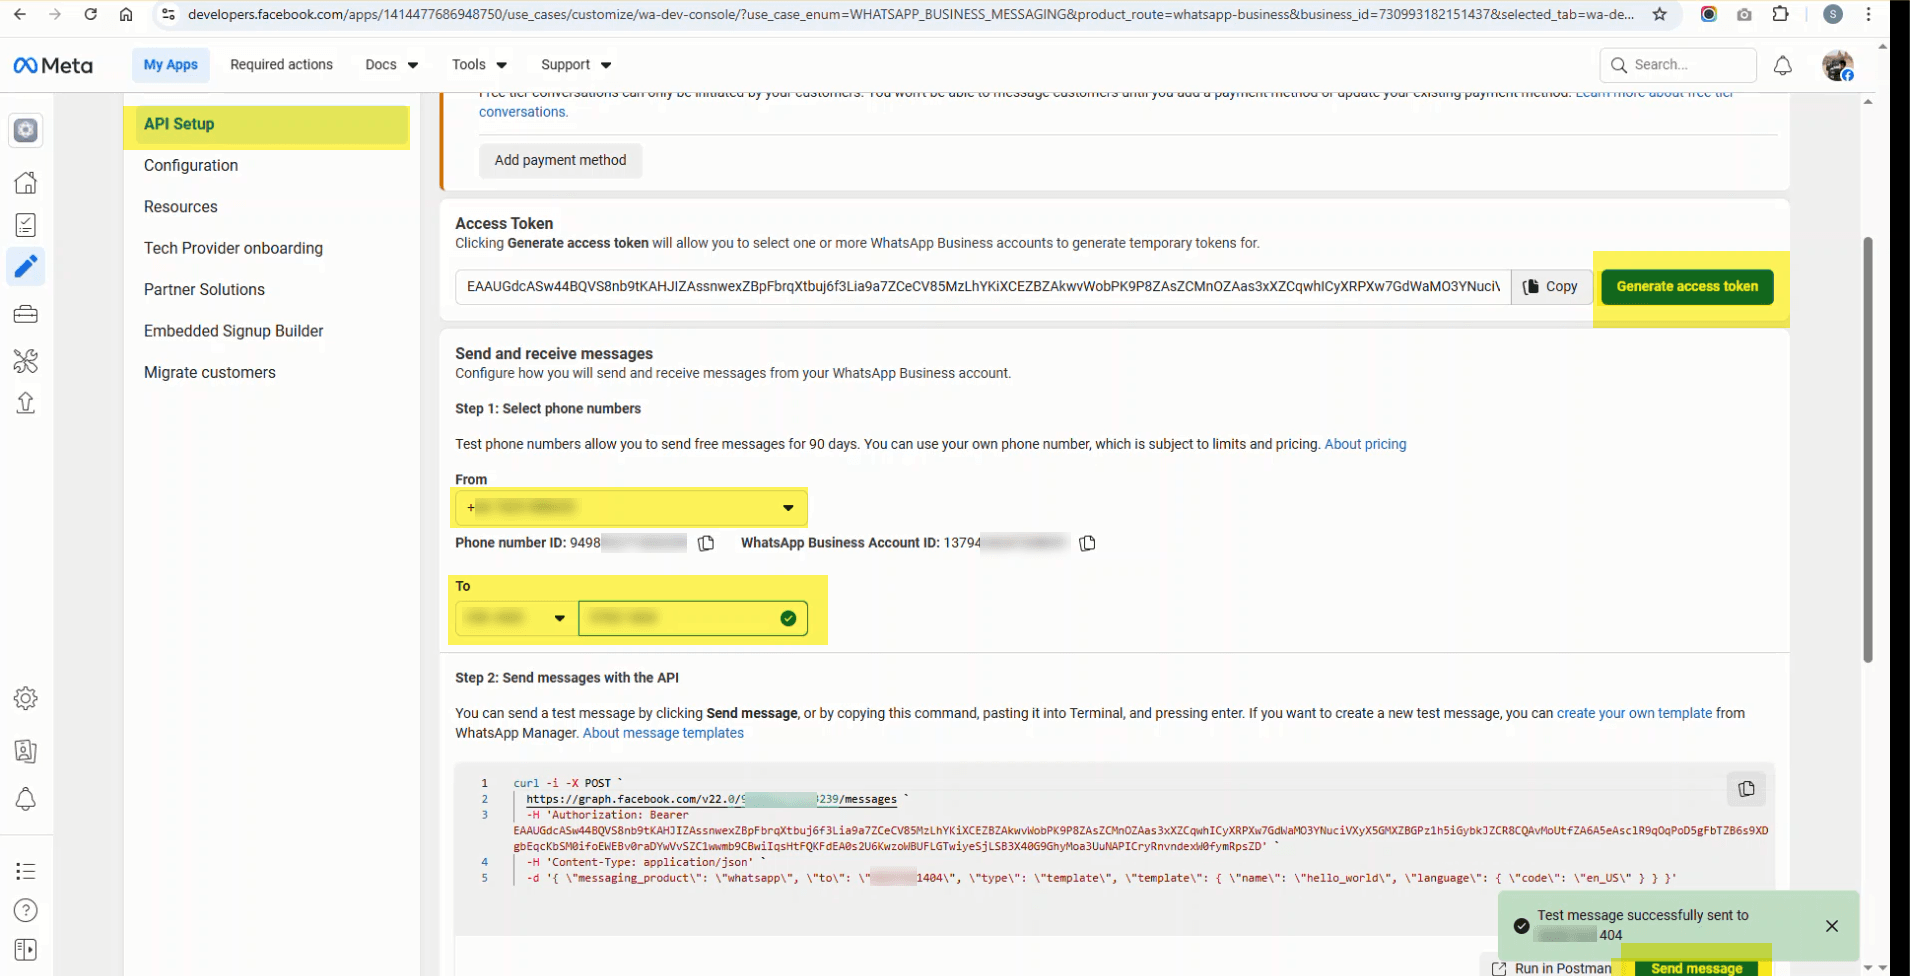
- Generate a temporary access token, select the sender number in From, enter the number on which you want to receive the message in To, and click the Send Message button to verify that you are receiving messages and that your WhatsApp app has been set up correctly.API Setup → Generate token → Select From number → Enter To number → Send Message
- Log in to WAMANAGER, go to Channel Settings .Copy Callback URL and Verify Token from Channel Settings
- 14.1Go to Developer AccountSelect Your App → Whatsapp → QuickStart → Configuration → Paste here the Callback URL and Verify token
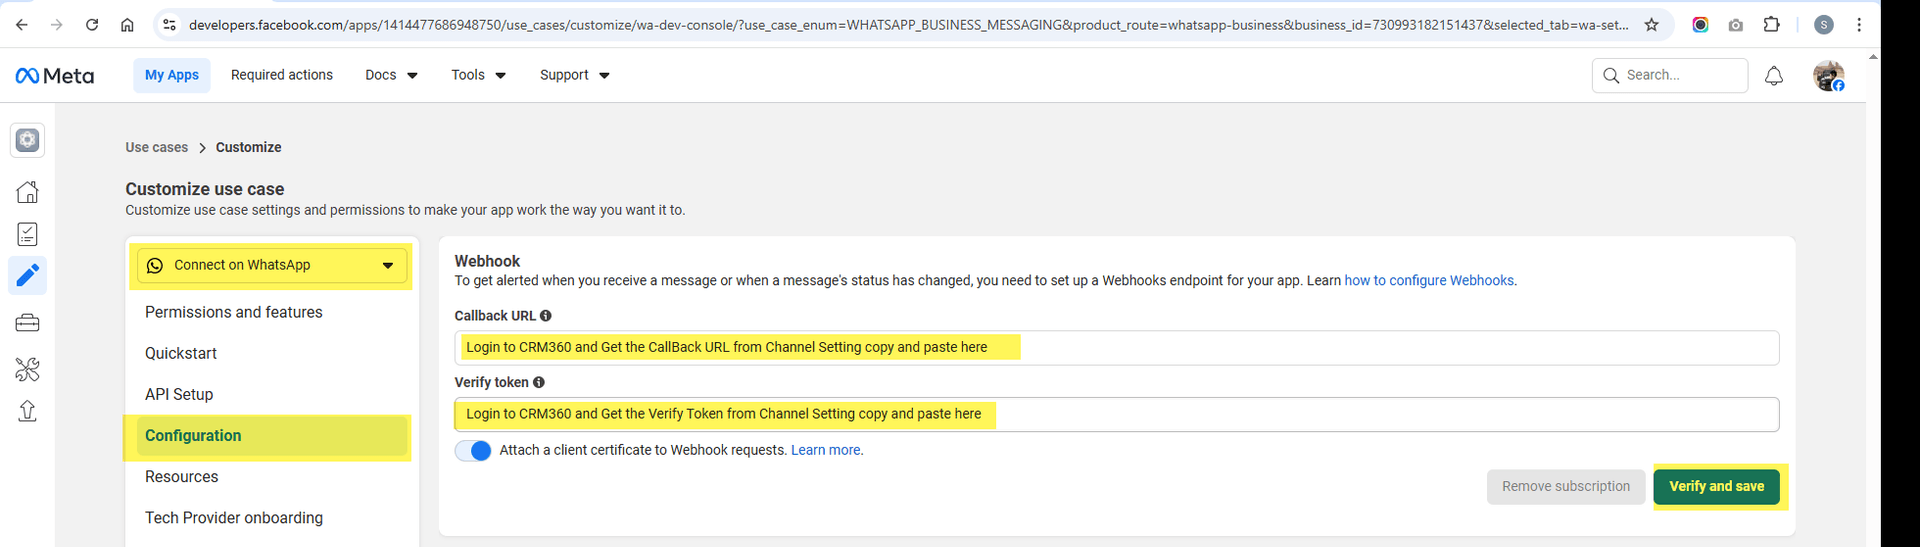
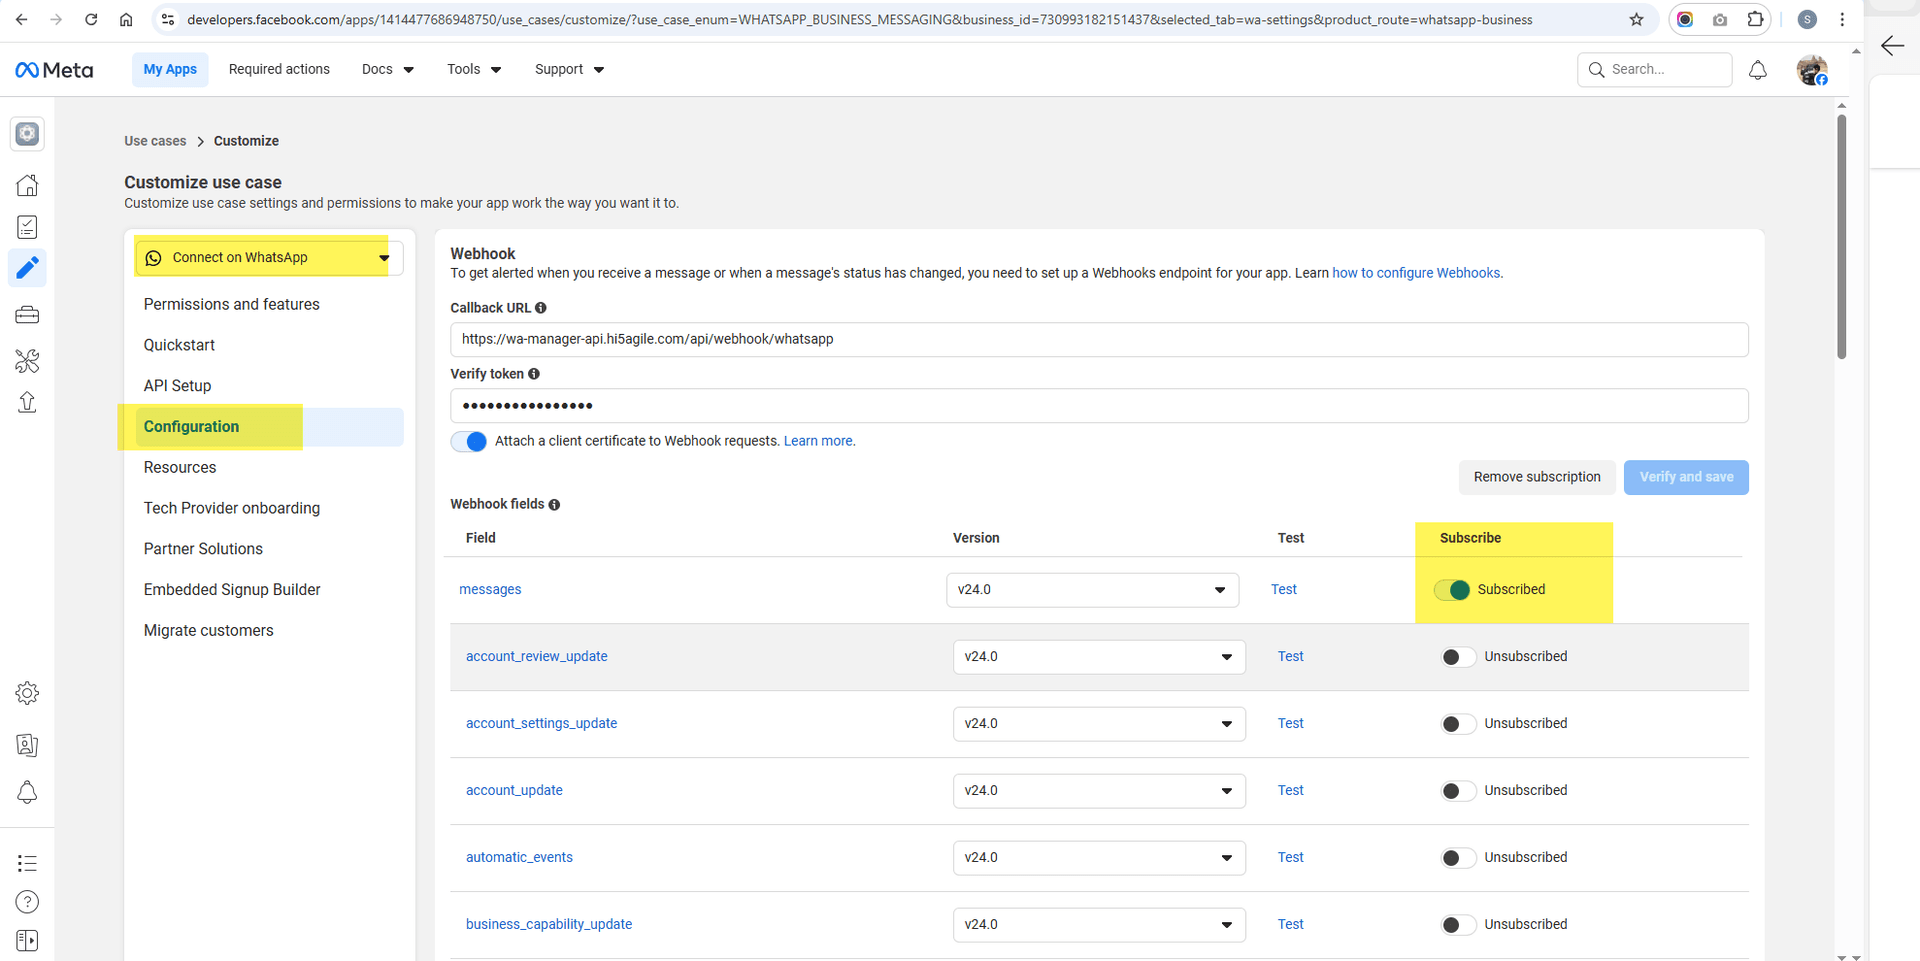
- 14.2After saving the Callback URL and Verify Token, scroll down, subscribe to Messages, and paste them here.Scroll down → Subscribe to Messages → Subscribe to Messages Template Status Update → Save
- 14.1Go to Developer Account
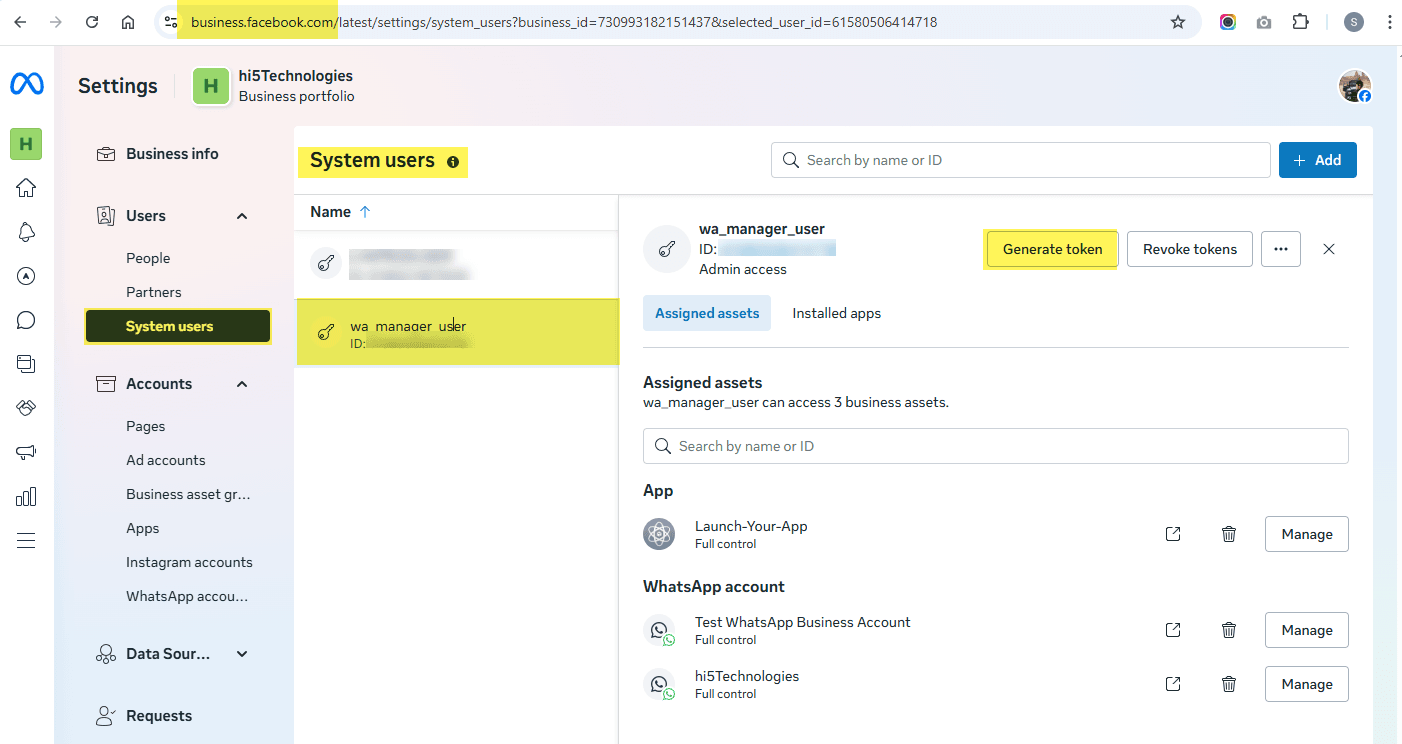
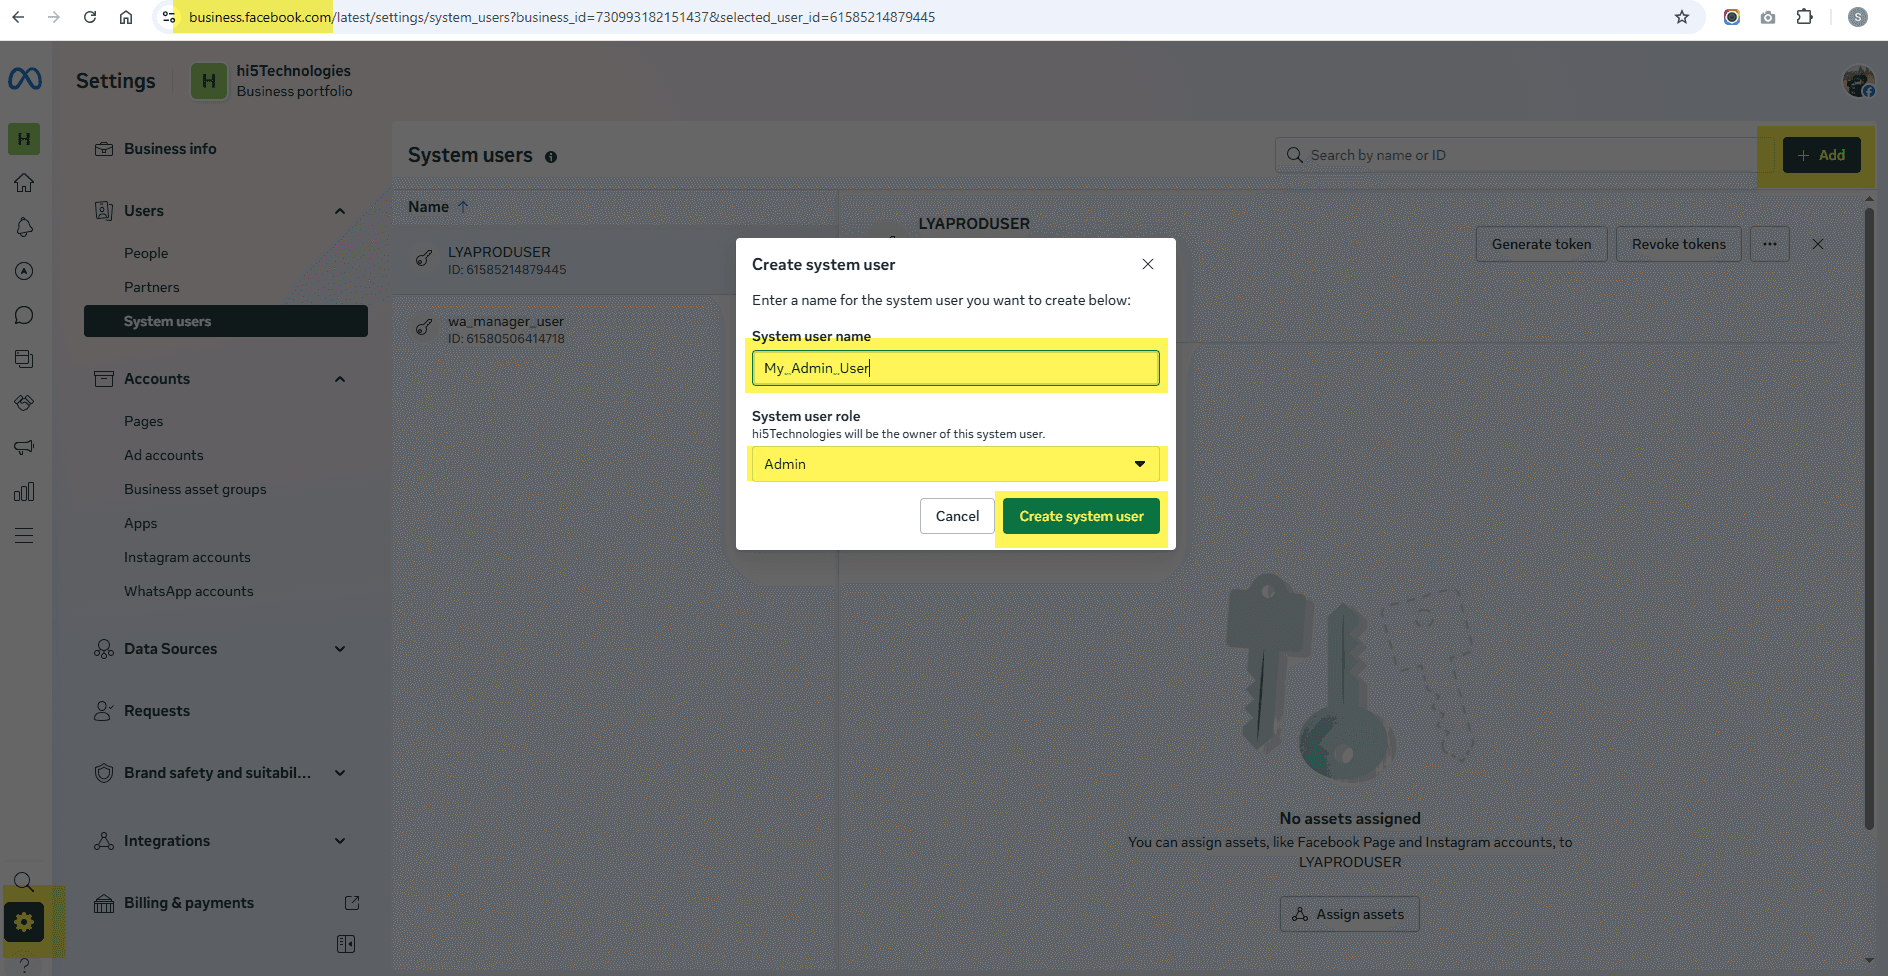
- Visit https://business.facebook.com/ , go to Settings → System Users, and click Add to create a system user. If you already have an admin system user, there is no need to create a new one.Settings → System Users → Add → Create system user
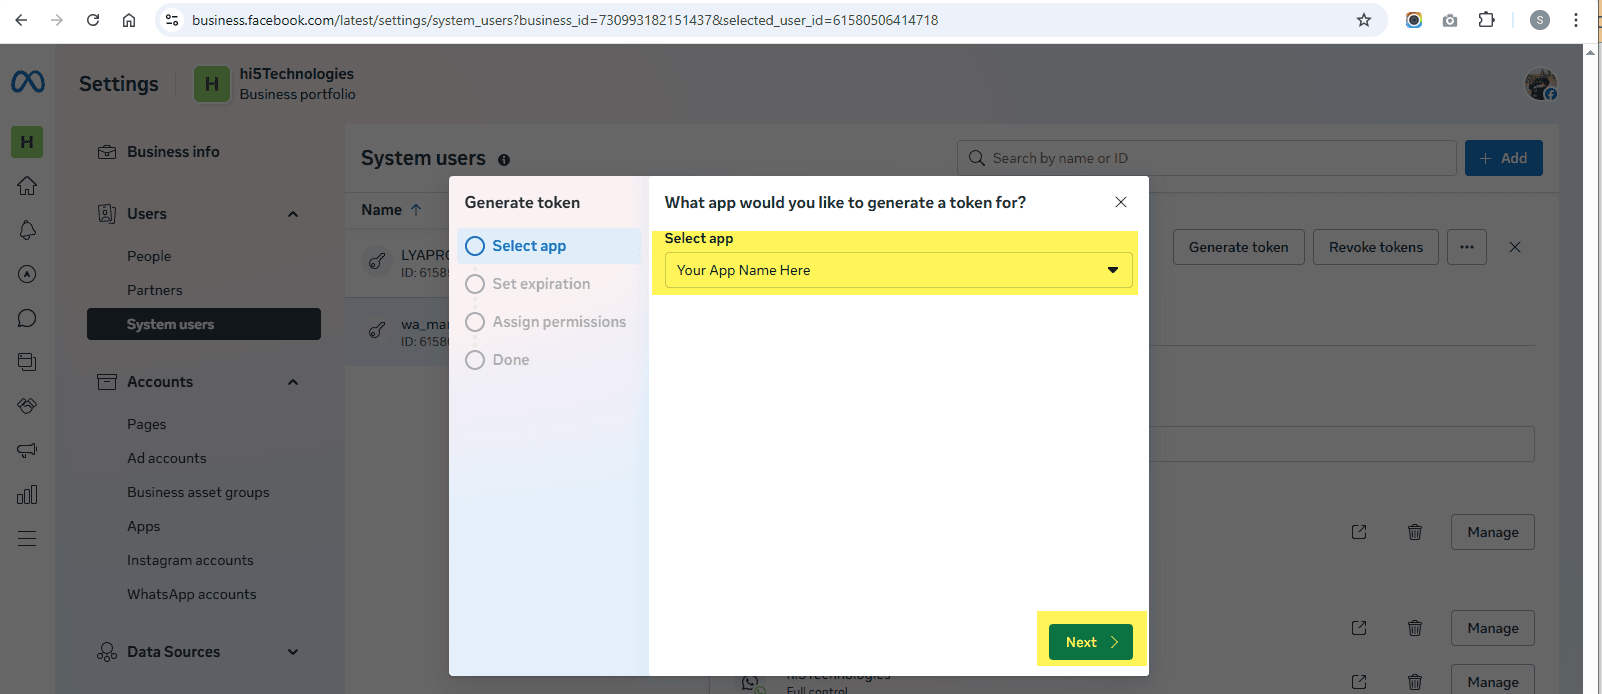
- Visit https://business.facebook.com/ , go to Settings → System Users, select an admin user, and click Generate Token. This will create a permanent access token for your app, which will be used with WAMANAGER.Settings → System Users → Select admin user → Generate Token
- 16.1 Select AppSelect your app from dropdown
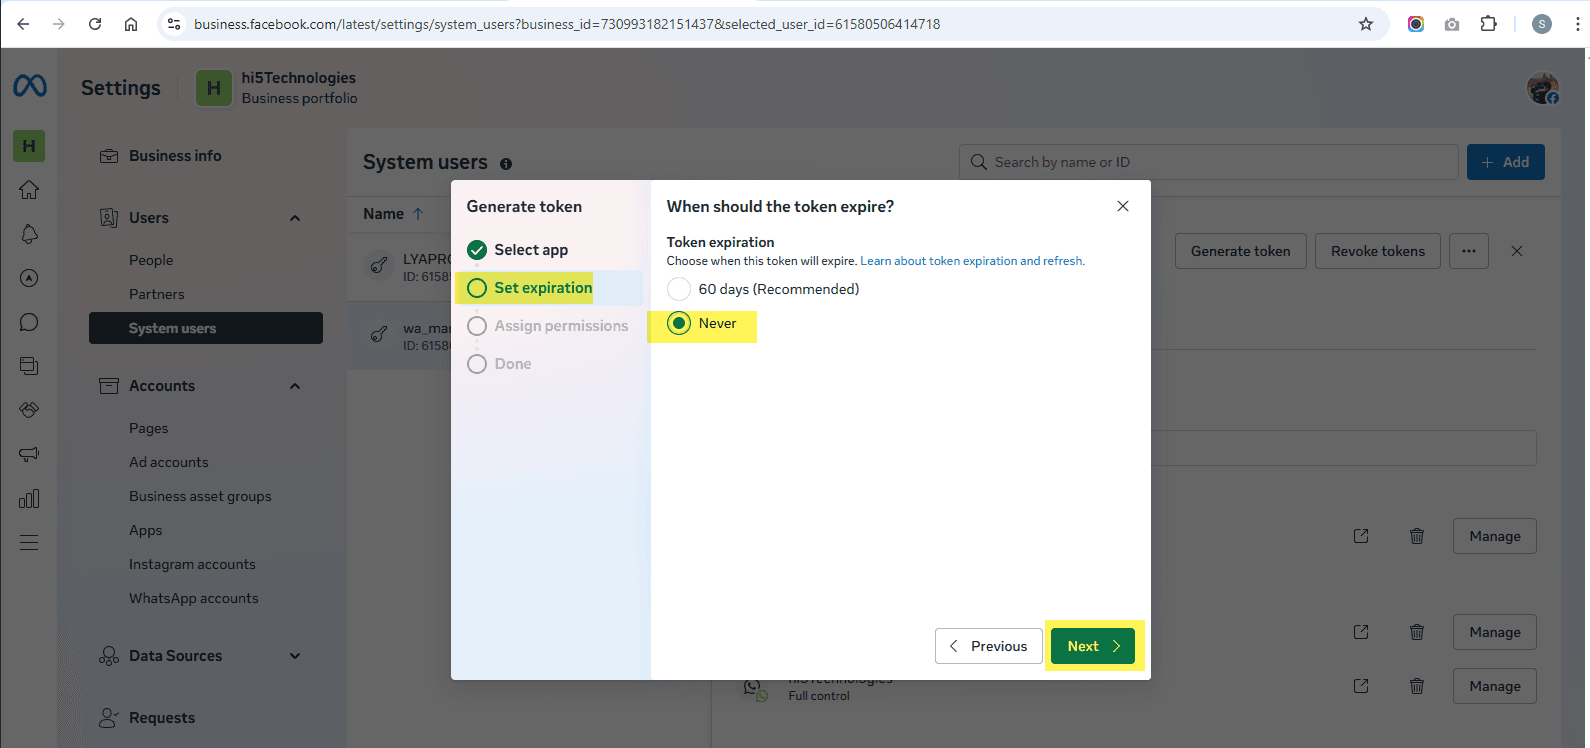
- 16.2 Select Token Expiration DateSelect expiration date (Preferred "Never") → Next
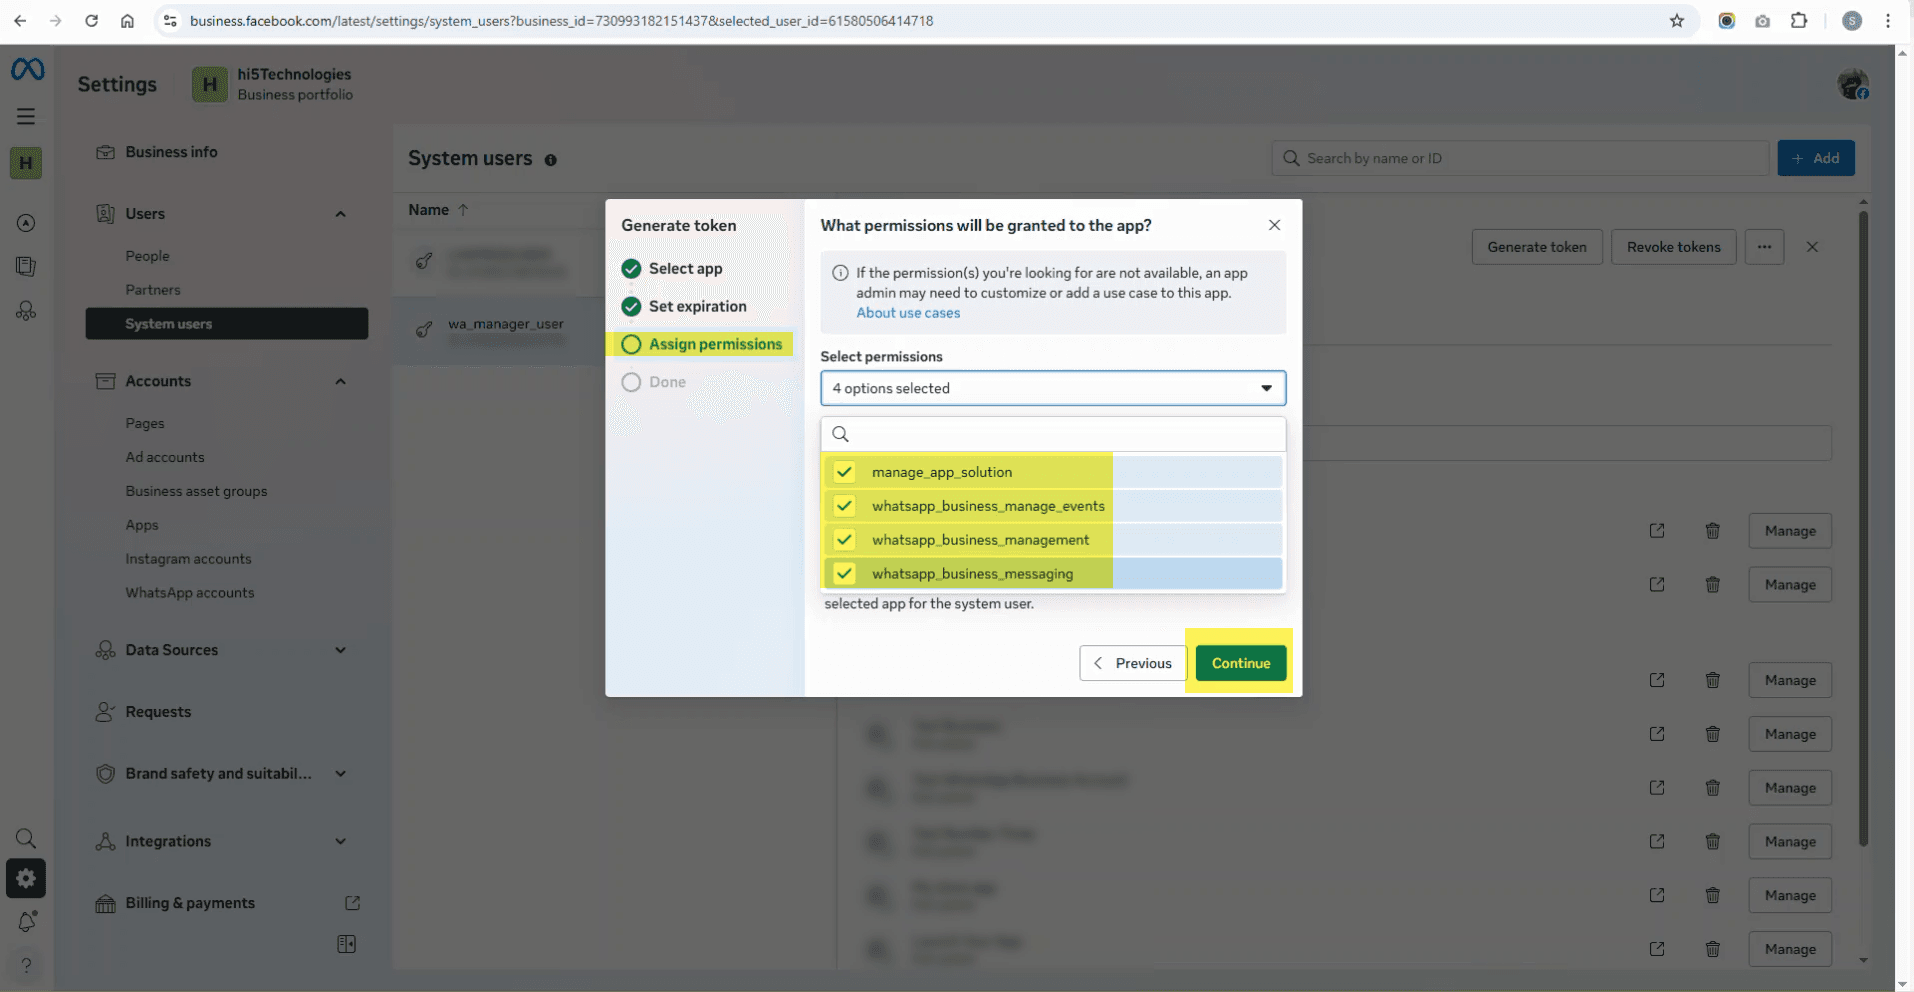
- 16.3 Select PermissionAssign permissions → Select All → Generate Token
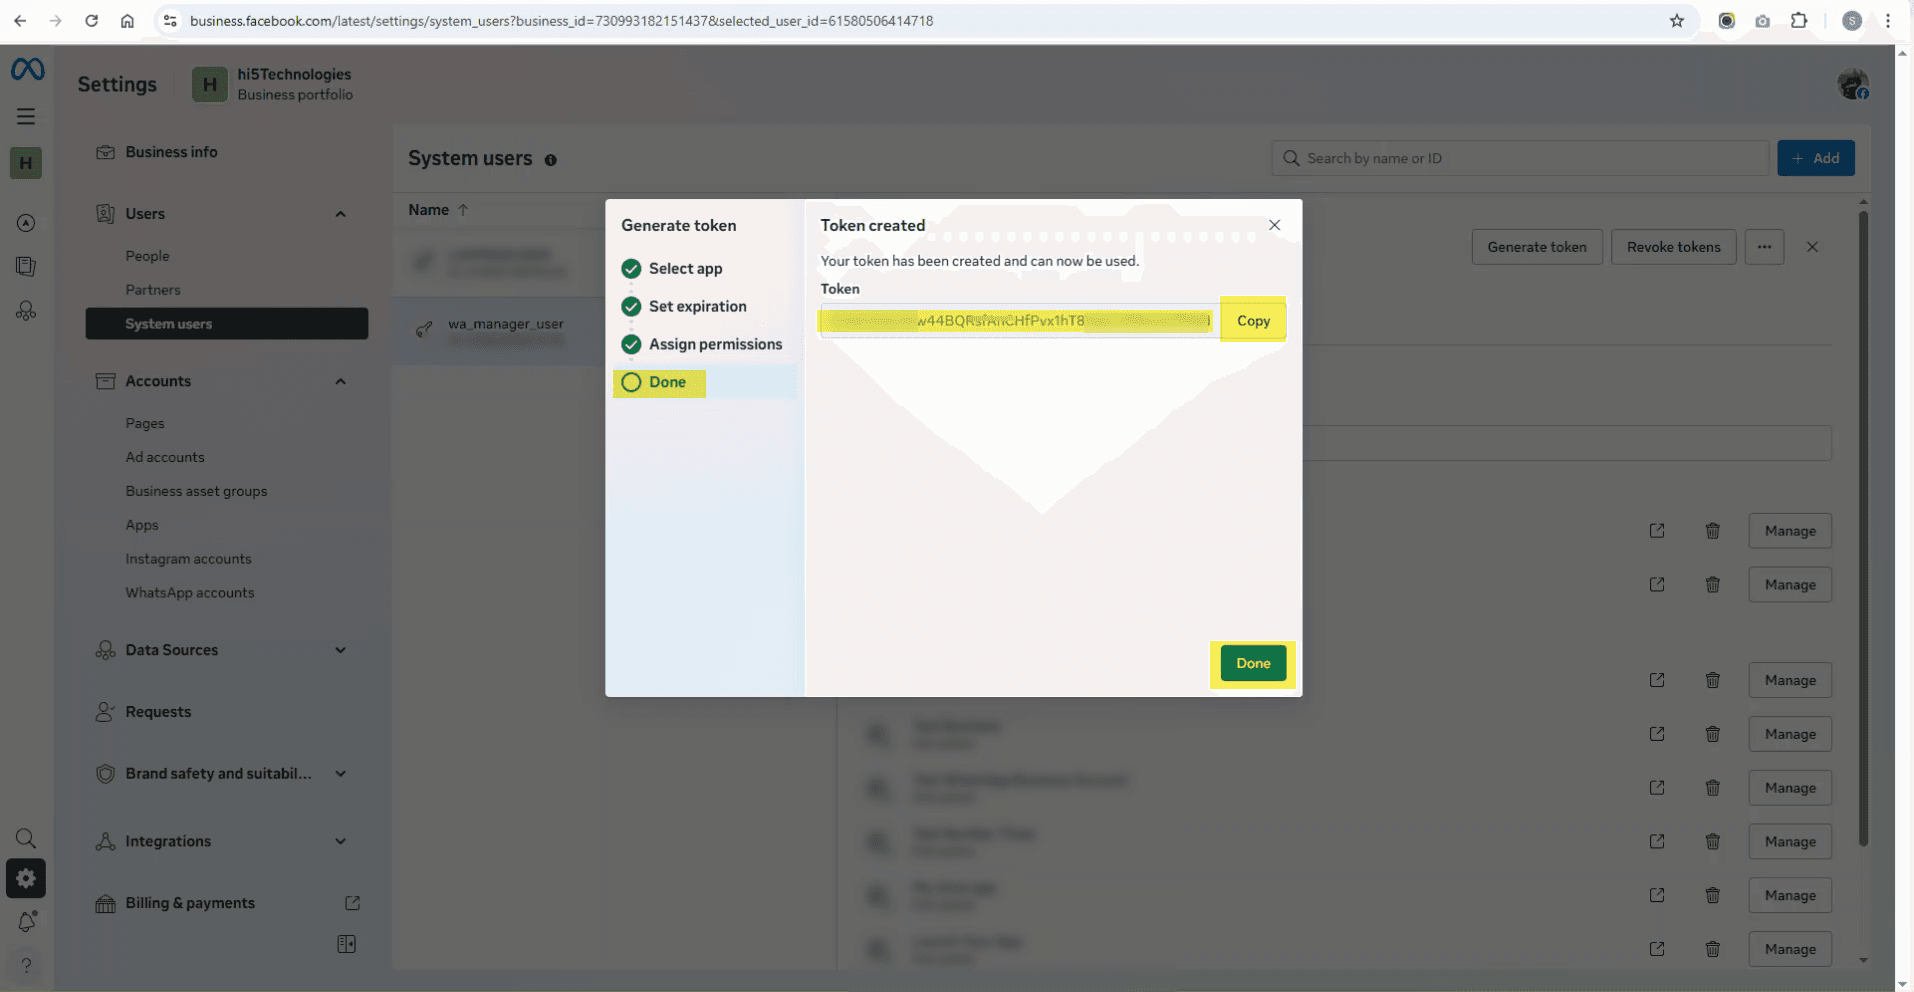
- 16.4 Copy your token, keep it safe, and add it to the WAMANAGER Channel Settings.Copy token → Add to Channel Settings → Save in Access Token
- 16.1 Select App
- Visit https://developers.facebook.com/apps/ , select the app you created, go to Publish → Connect with Customers through WhatsApp → API Setup, copy the WhatsApp Business Account ID and Phone Number ID, and add them to the WAMANAGER Channel Settings.Select app → Publish → Connect with Customers through WhatsApp → API Setup → Copy IDs
- 17.1 Copy the App ID from https://developers.facebook.com/apps/ and add it to the WAMANAGER Channel Settings.Copy App ID from app dashboard → Add to Channel Settings
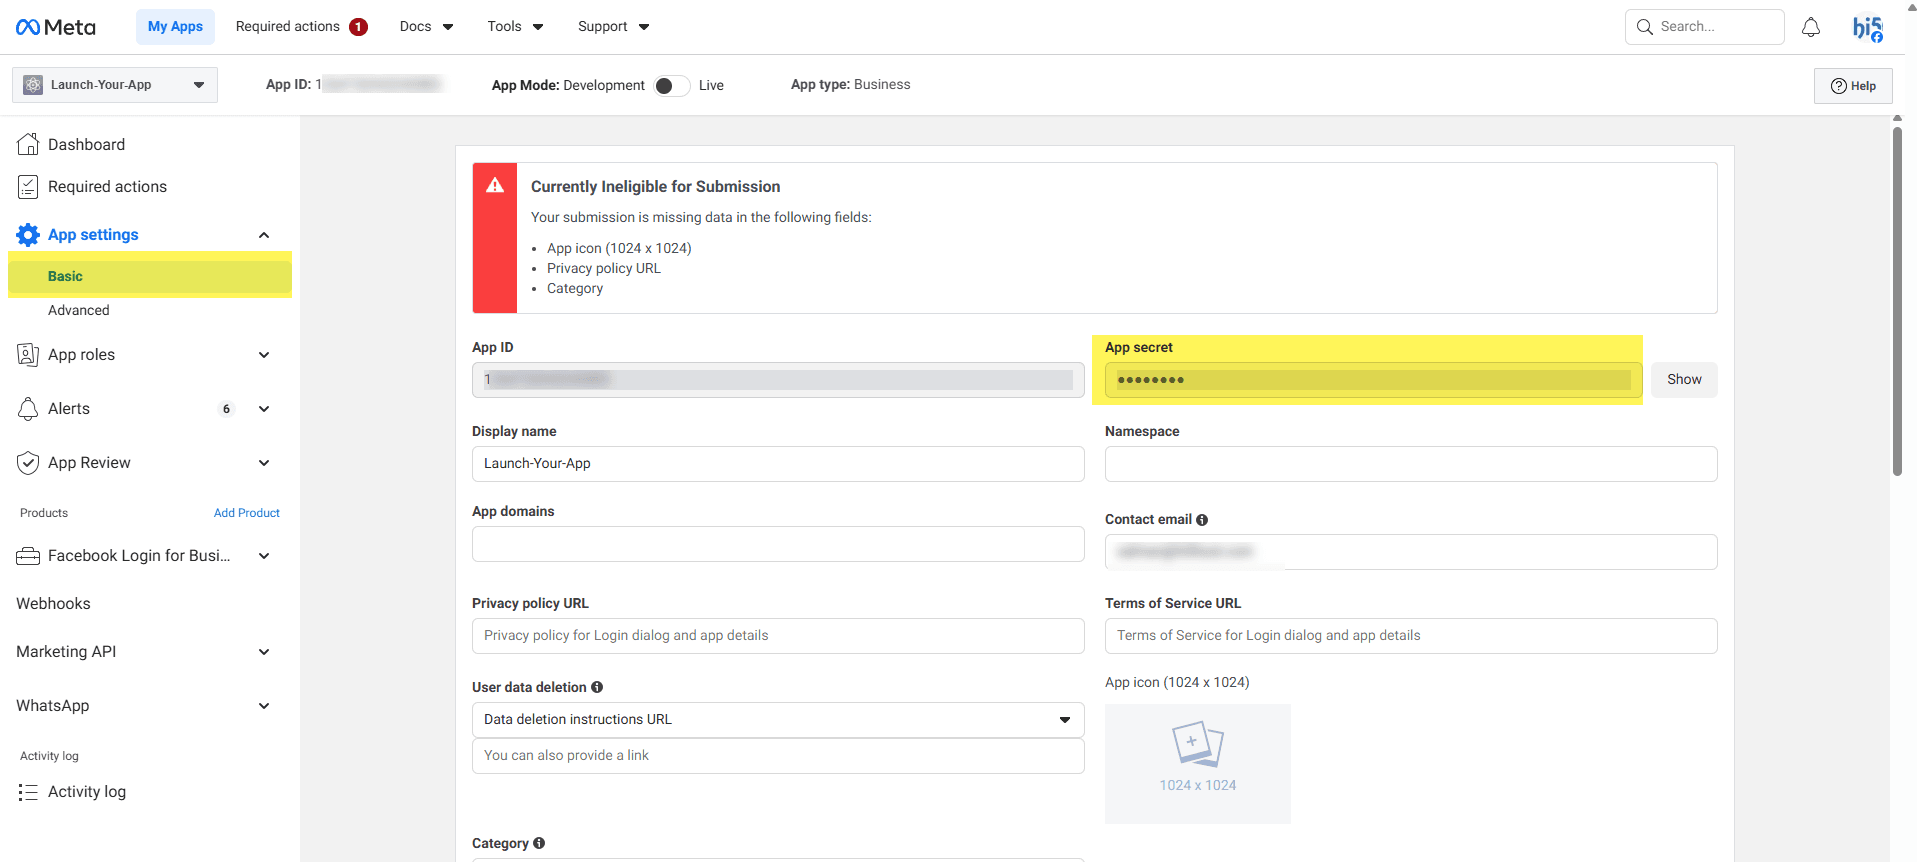
- 17.2 Copy the App Secret from https://developers.facebook.com/apps/ and add it to the WAMANAGER Channel Settings.Settings → Basic → Show App Secret → Copy → Add to Channel Settings
- 17.1 Copy the App ID from https://developers.facebook.com/apps/ and add it to the WAMANAGER Channel Settings.
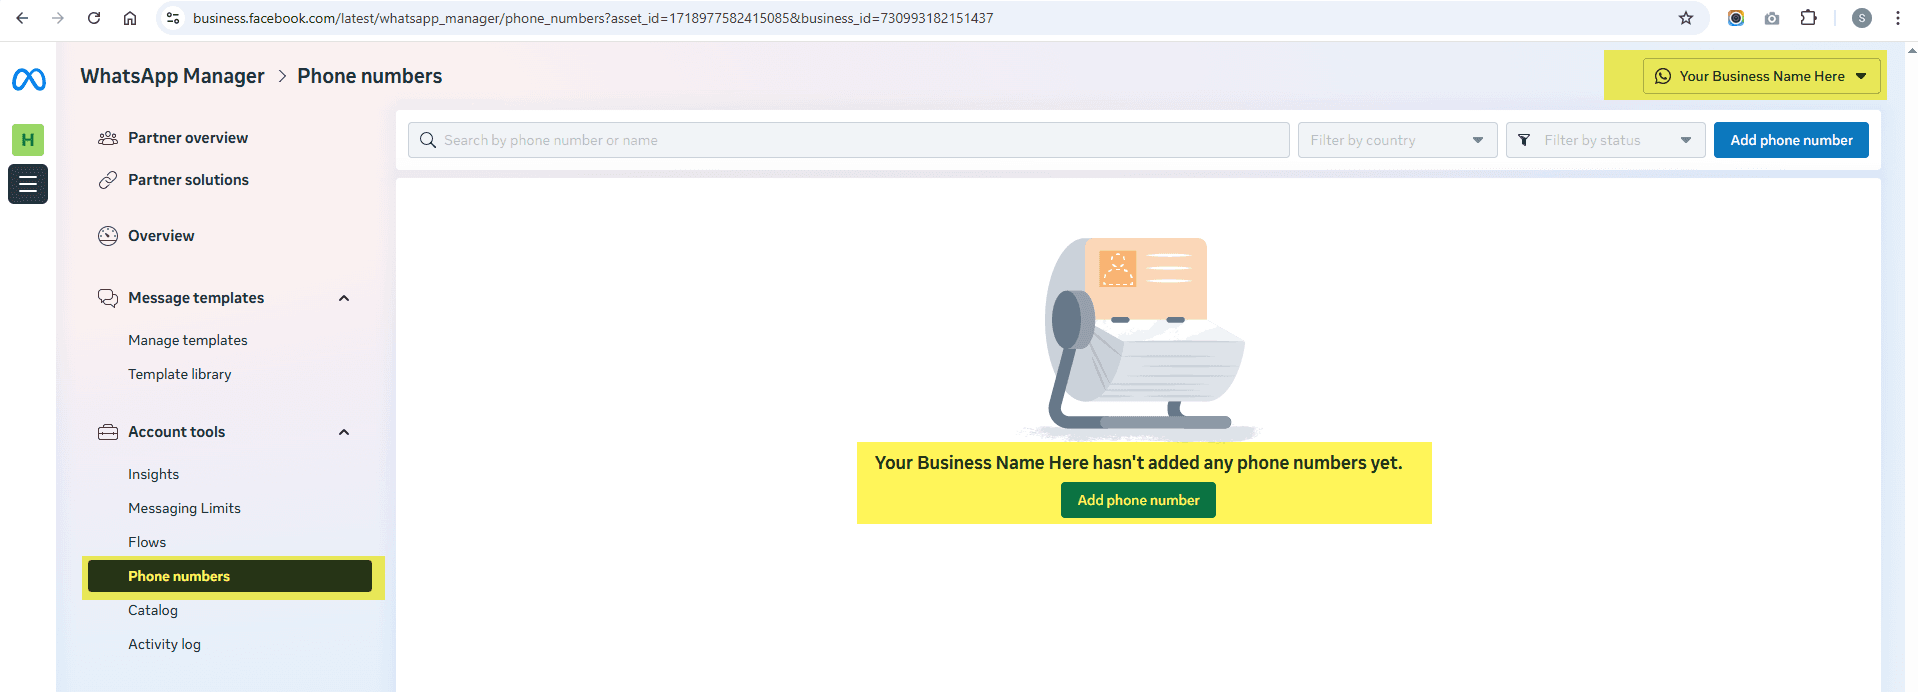
- Visit https://business.facebook.com/latest/whatsapp_manager/phone_numbers , select the app you created, and add your production phone number here.Select app → Add phone number → Verify
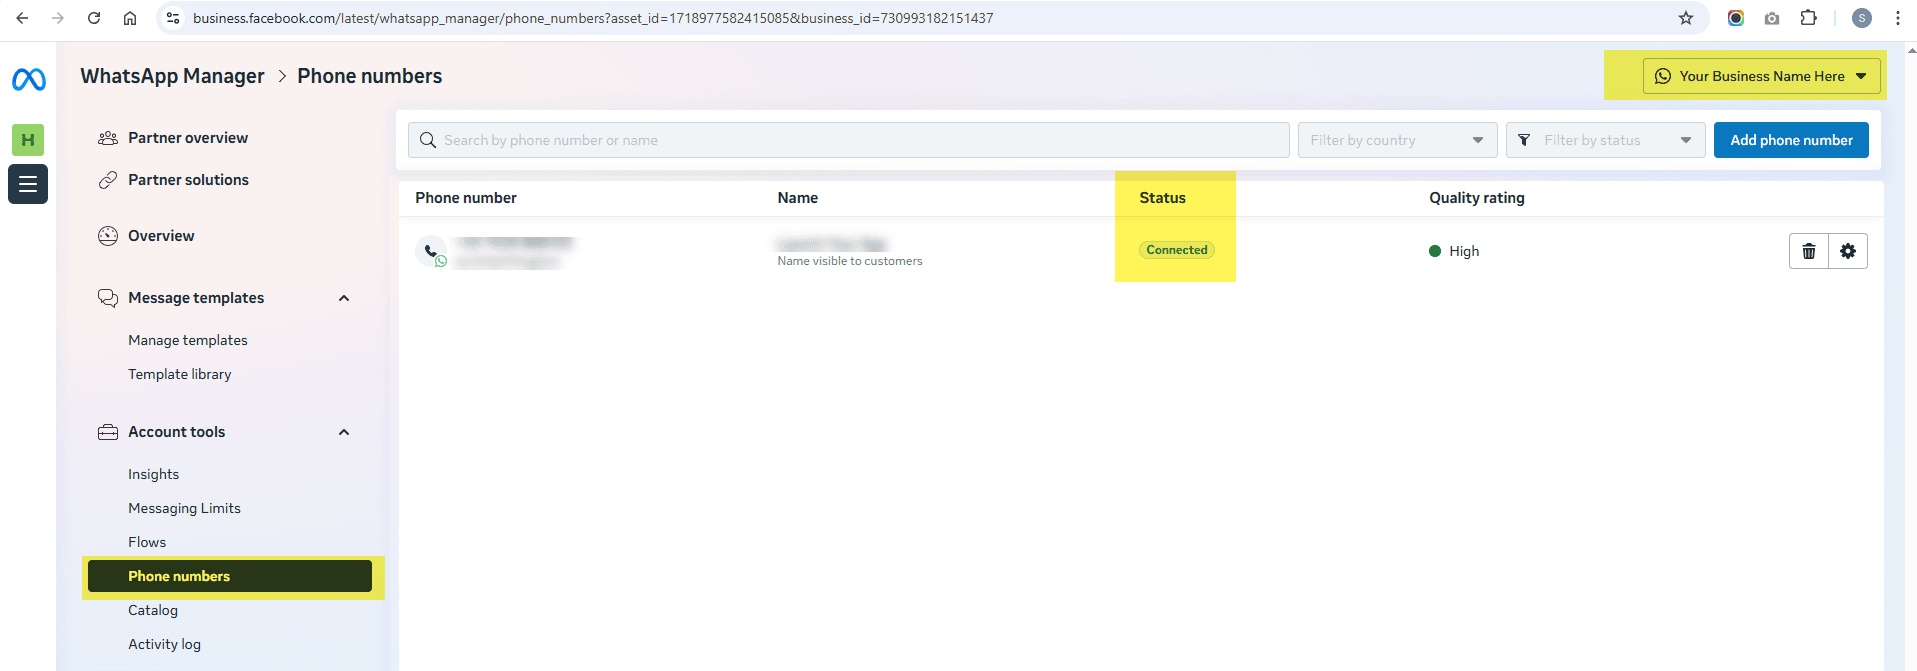
- Visit https://business.facebook.com/latest/whatsapp_manager/phone_numbers , select the app you created, and verify that the number you added appears as connected. If it does not appear as connected, ensure that the WAMANAGER Channel Settings are validated and saved correctly. Once it is validated, you will see the Subscribe option on the sameChannel Settings page. Make sure to subscribe.Verify phone number is connected → Subscribe in Channel Settings
- In WAMANAGER, your Channel Settings are complete when the status shows Good and Subscribed. WAMANAGER is now ready for testing - log in and enjoy using WhatsApp Business services.Check status shows "Good" and "Subscribed" → Ready to use


2. Generate External API Token
- Fill in all the required fields in Channel Settings
- Click the Generate Token button next to the External API Token field
- The token will be automatically generated and filled in
- This token is used to authenticate API requests to WAMANAGER
Setting Up Channel Settings:
- After logging in, if your channel settings are pending, you'll be redirected to the Channel Setting page
- You'll see a list of all available channels, each with its own expandable section
- Expand the channel you want to configure by clicking the chevron icon
- Fill in all required fields with your WhatsApp Business API credentials for that channel
- You can generate an External API Token automatically using the "Generate Token" button
- Double-check all information for accuracy
- Click "Validate & Update" to validate your credentials and save the channel settings
- Once validated successfully, the channel status will change from "Pending" to "Good"
- For WhatsApp channels, after successful validation, you'll see a "Subscribe" button appear
- Click the "Subscribe" button to subscribe your app to receive webhooks and notifications from Meta
- After subscribing, you'll see a "Subscribed" badge next to the channel status, indicating your app is successfully subscribed
- You'll be redirected to the Dashboard after successful setup
About Subscription: The "Subscribe" button appears only for WhatsApp channels after your credentials are validated successfully. Subscribing your app enables the platform to receive webhooks and notifications from Meta's WhatsApp Business API, which is essential for receiving incoming messages, delivery status updates, and other real-time events. The subscription status is displayed as a badge ("Subscribed" or "Unsubscribed") next to the channel status.
Important: Keep your access tokens secure and never share them publicly. Incorrect credentials will prevent the platform from sending messages through that channel. You can update channel settings later from the Settings section. Each channel's credentials are managed independently.
First Steps After Setup
Once your channel settings are configured, you're ready to start using the platform. Here's a recommended order of operations:
Recommended Workflow:
- Explore the Dashboard: Familiarize yourself with the overview and key metrics
- Add Contacts: Import or manually add your customer contacts
- Create Contact Groups: Organize contacts into groups for targeted messaging
- Upload Media Files: Add images, videos, and documents to your Media Gallery
- Create Templates: Design and submit template messages for approval
- Set Up Broadcast Types: Configure broadcast types with appropriate modes
- Create Broadcasts: Start sending messages to your contacts
- Create Quick Replies: Set up pre-written responses for common customer inquiries
- Set Up Chatbot Flows: Automate common customer interactions
- Configure Conversation: Set up chat sync and manage conversations
Tip: Don't worry about doing everything at once. Start with the basics like adding contacts and creating templates, then gradually explore more advanced features as you become comfortable with the platform.
Profile Settings
After initial setup, take a moment to configure your profile settings for a personalized experience.
Profile Configuration:
- Update your personal information
- Configure notification sound preferences
- Set up chat sync settings (enable/disable automatic chat synchronization)
- Choose your preferred language
- Configure default sound settings for different modules
Chat Sync: The chat sync setting controls whether conversations from connected channels are automatically synced into your Conversation. You can enable or disable this based on your workflow preferences.
You're All Set!
Once you've completed the initial setup and configured your channel settings, you're ready to start using the WAMANAGER Panel. Explore the sections in this guide to learn more about each feature and how to make the most of the platform.
If you need help at any point, refer to the relevant sections in this guide or contact your system administrator for assistance.
Dashboard
The Dashboard is your central hub that provides an overview of your WhatsApp Business account activity. It displays key metrics and statistics at a glance.
Key Features
- Activity Overview: View recent messages, broadcasts, and conversations
- Statistics: Monitor message delivery rates, read receipts, and engagement metrics
- Quick Actions: Access frequently used features directly from the dashboard
- Recent Activity: Track your latest actions and system notifications
Template Messages
Template Messages are pre-approved message formats that you can use to send notifications, marketing content, and utility messages to your customers. Templates must be approved by Meta before use.
Your Templates
Manage all your approved and pending templates in one place. You can view, edit, duplicate, and organize your templates.
Features:
- View all your templates (approved, pending, rejected)
- Create new templates with dynamic variables
- Edit existing templates (requires re-approval)
- Duplicate templates for quick creation
- Refresh templates to sync with Meta
- Filter templates by status, type, or category
Template Library
Browse through a collection of pre-built template examples and templates created by other users. Use these as inspiration or starting points for your own templates.
Template Types:
- Marketing Templates: Promotional messages, offers, announcements
- Utility Templates: Transactional messages, confirmations, updates
- Authentication Templates: OTP codes, verification messages
Broadcasts
Broadcasts allow you to send messages to multiple contacts at once. You can send messages immediately or schedule them for later delivery. Configure broadcast types with different modes and settings to suit your messaging needs.
Broadcast Type
Configure different types of broadcasts to categorize and organize your messaging campaigns. Each broadcast type can have specific settings and permissions.
Use Cases:
- Marketing campaigns
- Newsletter distributions
- Promotional announcements
- Event notifications
Broadcast Options & Settings
Configure broadcast modes and options to control how your messages are sent. Each broadcast type supports different sending modes based on your requirements.
Broadcast Modes:
Default Mode
Send broadcasts to selected contacts or contact groups. Choose individual contacts from your database or select entire groups for bulk messaging.
- Select contacts individually or by groups
- Use contact groups for targeted campaigns
- Perfect for regular marketing campaigns
Individual Mode
Send a broadcast to a single contact by providing their email, phone number, and country code. Useful for personalized messages or testing.
- Enter recipient email and phone number
- Specify country code and ISO code
- Ideal for one-on-one personalized messages
Bulk Mode
Upload a CSV file containing multiple recipients for large-scale broadcasts. The system will process the file and send messages to all contacts listed.
- Upload CSV file with contact information
- Process large recipient lists efficiently
- Best for mass marketing campaigns
Tip: When creating a broadcast type, select the appropriate broadcast mode based on your use case. You can change the mode when creating individual broadcasts, but the broadcast type's default mode will be pre-selected.
Scheduled Broadcast
Create and manage scheduled broadcasts to send messages at specific dates and times. Perfect for time-sensitive campaigns and automated messaging.
Features:
- Schedule broadcasts for future delivery
- Send immediately or schedule for later
- Select recipients from contacts or contact groups
- Use templates with dynamic variables
- Track broadcast status and delivery reports
- View detailed analytics for each broadcast
- Choose broadcast mode (Default, Individual, or Bulk)
- Upload CSV files for bulk mode broadcasts
Note: Make sure your templates are approved before scheduling broadcasts. Rejected templates cannot be used for broadcasts. For bulk mode, ensure your CSV file follows the required format with proper column headers.
Contacts Management
Manage your customer contacts and organize them into groups for efficient messaging and broadcast campaigns.
Contacts
Your central contact database where you can add, edit, and manage all your customer contacts.
Features:
- Add contacts manually or import from CSV/Excel
- Edit contact information (name, phone, email, etc.)
- View message history for each contact
- Search and filter contacts
- Export contacts to CSV
- View contact details and conversation logs
Contact Groups
Organize your contacts into groups to easily send targeted broadcasts and manage customer segments.
Features:
- Create custom contact groups
- Add or remove contacts from groups
- Use groups for targeted broadcasts
- Manage multiple groups for different campaigns
- View group statistics and member count
Conversation
The Conversation is your unified messaging center where you can manage all customer conversations in real-time. Multiple team members can collaborate on conversations.
Key Features
- Real-time Messaging: Send and receive messages instantly with live updates
- Conversation Management: View all conversations in a unified inbox
- Message Types: Support for text, images, videos, documents, locations, and contacts
- Template Messages: Send pre-approved templates directly from conversations
- Quick Replies: Use pre-written quick reply messages for faster responses
- Starred Messages: Mark important messages with a star for easy access later
- Chatbot Control: Enable or disable automated chatbot flows per conversation
- Team Collaboration: Multiple agents can view and respond to conversations
- Conversation Control: Take control of conversations, transfer to other team members
- Read Receipts: See when messages are delivered and read
- Search: Search through conversations and messages
- Chat History: Access complete conversation history
- Media Gallery Integration: Select and send media files directly from your media gallery
Chat Sync Setting
You can control whether chats are automatically synced from connected channels into your conversation. Navigate to Profile Settings to enable or disable chat synchronization based on your preferences.
Starred Messages
Star important messages to quickly access them later. Starred messages are saved in a dedicated section in the sidebar, making it easy to find and reference important information, customer requests, or key conversation points.
How to Star Messages:
- Click on any message in a conversation to open the message menu
- Select "Star" from the message options menu
- The message will be marked with a yellow star icon
- To unstar a message, click on it again and select "Star" to toggle it off
Viewing Starred Messages:
- Access the "Starred Messages" section from the sidebar
- View all your starred messages in one place, organized by date
- See sender and recipient information for each starred message
- Click on any starred message to jump directly to that conversation
- Filter starred messages by channel if needed
- Scroll to load more starred messages (infinite scroll)
Starred Message Display:
- Starred messages show a yellow star icon in the conversation
- In the starred messages view, messages are displayed with contact avatars
- Message content is shown with sender/recipient labels (e.g., "You ▸ Contact Name" or "Contact Name ▸ You")
- Template messages, interactive messages, and media files are properly displayed in the starred view
- Messages are grouped by date for easy navigation
Best Practice: Use starred messages to bookmark important customer requests, order details, addresses, or any information you need to reference later. This is especially useful for tracking follow-ups or important conversation points across multiple chats.
Chatbot Enable/Disable
Control whether automated chatbot flows are active for a specific conversation. This allows you to temporarily disable chatbot responses when you want to handle the conversation manually, or enable it to automate customer interactions.
How It Works:
- The chatbot toggle button is located in the conversation control buttons area
- Only the conversation organizer (person who has control) can enable or disable the chatbot
- By default, chatbots are enabled for all conversations
- The toggle is per-conversation, so you can disable chatbots for specific chats while keeping them active for others
Visual Indicators:
- Enabled (Green): When the chatbot is enabled, the button shows a Bot icon with a green background
- Disabled (Gray): When the chatbot is disabled, the button shows a BotOff icon with a gray background
- Hover over the button to see a tooltip indicating the current state and action (Enable Chatbot or Disable Chatbot)
When to Use:
- Disable Chatbot: When you need to handle a conversation manually without automated responses interfering
- Enable Chatbot: When you want automated chatbot flows to handle customer inquiries and provide automated responses
- Useful for complex customer issues that require human intervention
- Helpful when you want to prevent automated responses during sensitive conversations
Note: The chatbot enable/disable setting is specific to each conversation. Disabling the chatbot for one conversation does not affect other conversations. You can toggle it on or off at any time as needed.
Important: Only users who have control of the conversation (organizers) can toggle the chatbot. If you don't see the toggle button, you may need to ask for control of the conversation first.
Quick Replies
Quick Replies are pre-written message templates that you can use to quickly respond to common customer inquiries in the Conversation. Save time by creating reusable responses for frequently asked questions and standard interactions.
Managing Quick Replies
Create, edit, and organize your quick reply messages to streamline customer support and improve response times.
Features:
- Create quick replies with shortcuts for easy access
- Edit existing quick replies to update content
- Delete individual or multiple quick replies
- Search and filter quick replies by shortcut or content
- Assign quick replies to specific channels
- Use rich text formatting in quick reply messages
- Bulk operations for managing multiple quick replies at once
Creating Quick Replies
When creating a quick reply, you'll need to provide a shortcut keyword and the message content. You can also assign it to specific channels.
Quick Reply Components:
- Shortcut: A keyword or phrase that helps you quickly find and use the quick reply
- Message: The actual message content that will be sent to customers (supports rich text formatting)
- Channels: Optionally assign the quick reply to specific channels for better organization
Tip: Use descriptive shortcuts that are easy to remember. For example, use "greeting" for welcome messages, "pricing" for price inquiries, or "hours" for business hours information.
Using Quick Replies in Conversation
Quick replies are easily accessible directly from the Conversation message input area, allowing you to send pre-written responses with just a few clicks.
How to Use:
- Open a conversation in Conversation
- Click on the quick reply icon in the message input area
- Search for a quick reply by typing the shortcut or message content
- Select the desired quick reply from the dropdown
- The message will be inserted into the input field - you can edit it if needed
- Send the message as usual
Best Practice: Create quick replies for common scenarios like greetings, order confirmations, FAQ responses, and closing messages. This will significantly speed up your response time and ensure consistent messaging across your team.
Channel Assignment
Assign quick replies to specific channels to organize them better and ensure the right responses are available for the right contexts.
Benefits:
- Organize quick replies by channel or business unit
- Filter quick replies when searching in Conversation
- Maintain channel-specific responses and messaging
- Select all channels or specific ones when creating quick replies
Media Gallery
The Media Gallery is your centralized storage for all media files including images, videos, documents, and audio files. Organize your media into folders for easy access and use them in broadcasts, templates, and conversations.
File Management
Upload, organize, and manage all your media files in one place. The media gallery supports various file types and provides easy access for use across the platform.
Supported File Types:
- Images: JPEG, PNG, GIF, WebP, and other image formats
- Videos: MP4, AVI, MOV, and other video formats
- Documents: PDF, DOC, DOCX, XLS, XLSX, CSV, TXT, and more
- Audio: MP3, WAV, OGG, and other audio formats
Features:
- Upload single or multiple files at once
- Upload files in bulk using ZIP archives
- Search files by name or filter by type
- Copy file URLs for external use
- Download files individually or in bulk
- Delete files or folders with confirmation
- View file details including size, type, and upload date
- Preview images and videos directly in the gallery
Folder Organization
Organize your media files into folders and subfolders for better management. Create a hierarchical structure that matches your workflow and makes files easy to find.
Folder Features:
- Create folders and nested subfolders
- Rename folders to match your organization structure
- Delete folders (files inside will also be deleted)
- Navigate through folder hierarchy with breadcrumbs
- View folder contents and file counts
- Expand and collapse folder trees for easy navigation
Tip: Organize your media into folders by campaign, date, or content type (e.g., "Marketing 2024", "Product Images", "Video Tutorials") to quickly find files when creating broadcasts or sending messages.
Upload Options
Multiple ways to upload files to your media gallery, making it easy to add content from various sources.
Upload Methods:
- Single File Upload: Select and upload individual files one at a time
- Multiple File Upload: Select and upload multiple files simultaneously
- ZIP Archive Upload: Upload a ZIP file containing multiple files - they will be automatically extracted
- Folder Selection: Upload files directly to specific folders
Note: When uploading multiple files, the system will process them in batches. If some files fail to upload, you'll see detailed error messages for each file. Successful uploads will still be added to your gallery.
Integration with Other Features
Use your media gallery files across various features of the platform for seamless content management.
Where You Can Use Media Files:
- Broadcasts: Select images, videos, or documents when creating broadcasts
- Templates: Use media files in template messages
- Conversation: Send media files directly from the gallery in conversations
- Chatbot Flows: Include media files in automated conversation flows
File Selection Mode:
When opening the media gallery from other features, you can filter files by type (images, videos, documents) to quickly find what you need. The gallery will show only relevant files based on the context.
Chatbot Flow Builder
Create automated conversation flows to handle customer inquiries, provide information, and guide users through predefined paths. Chatbot flows can automate responses and reduce manual workload by handling common questions and routing complex queries to human agents.
Flow Creation & Management
Build interactive chatbot flows with multiple steps, options, and decision points. Each flow can be customized with multi-language support and keyword triggers.
Key Features:
- Multi-language Support: Create flows in multiple languages with translations
- Keyword Triggers: Set up keywords that activate specific flows when users send messages
- Step Management: Add, edit, delete, and reorder steps in your flow
- Start Step: Designate any step as the entry point of your flow
- Flow Preview: Preview your flow in real-time as you build it
- Flow Validation: System validates flows before saving to ensure they work correctly
Step Configuration
Each step in your chatbot flow can contain messages, options, and navigation logic to create interactive conversations.
Step Features:
- Rich Text Messages: Add formatted text messages with rich text editor support
- Option Types: Choose from multiple option types (None, Buttons, Interactive List, Interactive List Sections, Navigation Options)
- Next Step Navigation: Define which step comes next based on user selection or text input
- Option Management: Add, edit, delete, and reorder options within steps using drag-and-drop
- Multi-language Messages: Provide step messages in different languages
Message Types in Steps:
- Text Messages: Rich text messages with formatting support
- Media Messages: Images, videos, and documents from media gallery
- Template Messages: Pre-approved WhatsApp templates
- Interactive Messages: Messages with buttons, lists, and navigation options
Option Types:
- None - Text Input Only: Users can only enter text. Configure where to navigate after text input.
- Buttons: Up to 3 interactive buttons. Each button can navigate to a specific step, start the flow, or end the flow.
- Interactive List: Up to 10 options in a scrollable list format. Perfect for menus with many choices.
- Interactive List (Sections): Up to 10 sections, each containing multiple options. Organize options into categorized sections for better user experience.
- Navigation Options: Options with A, B, C keys for quick selection. Users can type the key letter to select an option.
Interactive List Sections:
Organize options into sections with titles. Each section can contain multiple options, making it easier for users to find what they're looking for.
- Create up to 10 sections per step
- Each section can have a title and multiple options
- Options within sections can be reordered using drag-and-drop
- Each option can navigate to different steps or actions
Navigation Options:
Create options that users can select by typing letter keys (A, B, C, etc.). Options are organized into groups for better management.
- Create navigation groups to organize options
- Each option is automatically assigned a letter key
- Users can type the letter to quickly select an option
- Options can navigate to steps, start flow, or end flow
Flow Workflow
Understand how chatbot flows work and how users interact with them.
How It Works:
- Trigger: Flow is activated when a user sends a message matching configured keywords
- Start Step: Bot sends the message from the designated start step
- User Response: User selects an option (button, list item, navigation key) or sends a text message
- Navigation: Bot moves to the next step based on the user's selection or configured action
- Continuation: Process continues through the flow until completion, end flow action, or handoff to agent
Option Actions:
Each option in a step can be configured with different actions to control flow navigation:
- Next Step: Navigate to a specific step in the flow (custom navigation)
- Start Flow: Return to the main menu/start step of the flow
- End Flow: Exit the flow and end the conversation
- None: End the flow after displaying the message (for text-only steps)
Text Input Handling:
For steps with "None" option type (text input only), you can configure where users navigate after entering text:
- Navigate to a specific step based on text input
- End the flow after text input
- If user sends invalid text, the "Invalid Message" from flow settings is shown
Best Practice: Always designate a start step for your flow. Without a start step, the flow won't know where to begin when triggered. Test your flows thoroughly before activating them to ensure smooth user experience. Use "Start Flow" action to create return-to-menu options for better navigation.
Common Use Cases
Customer Support
Automate FAQ responses and route to agents
Lead Qualification
Collect information and qualify leads
Order Tracking
Provide order status and updates
Appointment Booking
Schedule appointments automatically
Product Information
Provide product details and specifications
Survey & Feedback
Collect customer feedback and ratings
Notifications
Stay informed about important events, message deliveries, system updates, and activity in your account through the notifications center.
Notification Types
- Message Notifications: New messages, delivery status, read receipts
- Broadcast Updates: Broadcast completion, delivery reports
- Template Status: Template approval, rejection, or updates
- System Alerts: Account updates, maintenance notices
- Team Activity: Actions by team members
User Management
Manage team members, assign roles, and control access to different features of the panel.
Users
Add, edit, and manage user accounts for your team members.
Features:
- Create new user accounts
- Edit user information and permissions
- Deactivate or remove users
- Assign roles to users
- View user activity and login history
Roles
Create and manage roles with specific permissions to control what features each user can access.
Features:
- Create custom roles with specific permissions
- Assign permissions for each feature
- Edit role permissions
- Assign roles to users
- View which users have each role
Tip: Use roles to implement a least-privilege access model. Only grant permissions that users need for their specific tasks.
Settings
Configure your account settings, business details, and preferences to customize your experience.
Chatbot Flow Settings
Configure system messages and behavior for your chatbot flows. These settings control how the bot responds in various scenarios.
Message Types:
- Invalid Message: Message shown when a user sends an invalid option or input that doesn't match any configured option. You can add up to 3 action buttons to guide users (e.g., "Try Again", "Go to Main Menu", "End Flow").
- Thank You Message: Message displayed to thank users after completing a flow or action. Can include action buttons for follow-up navigation.
- Session Timeout Message: Message shown when a user's session times out due to inactivity. Configure the timeout duration in minutes and add action buttons for re-engagement.
Message Configuration:
- Use rich text editor to format messages (up to 1024 characters)
- Add up to 3 action options per message type
- Each option can have a label (up to 20 characters)
- Configure action types: None, Start Flow (Main Menu), End Flow (Exit), or Next Step (Custom)
- For "Next Step" actions, select which step to navigate to from active flow steps
- Options can be reordered using drag-and-drop
Session Timeout Settings:
- Set timeout duration in minutes (must be a positive integer)
- When session times out, the timeout message is displayed
- Users can use action buttons to restart the flow or navigate to specific steps
Key Features:
- Expandable cards for each message type for easy navigation
- Clear data option to reset message and options for each type
- Real-time validation ensures proper configuration
- Auto-generated option keys (1, 2, 3) for easy reference
- Integration with active flow steps for navigation options
Tip: Configure clear and helpful messages for each scenario. Invalid message options can help users recover from errors, while thank you messages can guide users to next steps. Session timeout messages help re-engage inactive users.
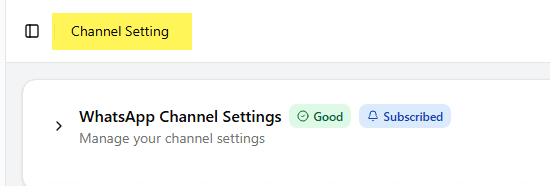
Channel Setting
Configure your WhatsApp Business account credentials and API settings for each channel separately. This allows you to manage multiple channels with different credentials independently.
Channel-Wise Credential Management:
The Channel Setting page displays all available channels, each with its own expandable section where you can configure:
- Channel: Unique identifier for the channel (read-only)
- Company Name: Your business or company name for this channel
- Phone Number ID: WhatsApp Business phone number identifier
- App ID: Your Meta App ID
- App Secret: Your Meta App Secret
- WABA ID: WhatsApp Business Account ID
- Access Token: Your API access token (keep this secure)
- Verify Token: Token for webhook verification
- External API Token: Additional API token (can be generated automatically)
Updating Channel Settings:
- Navigate to the Channel Setting page from the Settings section
- Expand the channel you want to update by clicking the chevron icon
- Update any of the credential fields as needed
- Click "Validate & Update" to validate your credentials and save the changes
- After successful validation, the channel status will show as "Good"
- For WhatsApp channels, if your app is not yet subscribed, a "Subscribe" button will appear
- Click the "Subscribe" button to subscribe your app to receive webhooks and notifications from Meta
- The subscription status badge will update to show "Subscribed" once the subscription is successful
Key Features:
- Expand or collapse each channel's settings for easy navigation
- Channels with pending settings are highlighted with an amber badge
- Channels with valid credentials show a "Good" status badge
- Channels with invalid credentials show an "Invalid" status badge
- Generate External API Token automatically for each channel
- Validate and update channel settings individually using the "Validate & Update" button
- For WhatsApp channels, subscribe your app after validation to receive webhooks and notifications
- Subscription status is displayed as "Subscribed" or "Unsubscribed" badge
- Each channel's credentials are managed independently
- Update individual channels without affecting others
About Subscription: The "Subscribe" button appears only for WhatsApp channels after your credentials are validated successfully (status shows as "Good"). Subscribing your app enables the platform to receive webhooks and notifications from Meta's WhatsApp Business API, which is essential for receiving incoming messages, delivery status updates, and other real-time events. The subscription status badge ("Subscribed" or "Unsubscribed") appears next to the channel status badge.
Important: Keep your access tokens secure and never share them publicly. Incorrect credentials will prevent the platform from sending messages through that specific channel. Each channel operates independently with its own credentials.
Profile Settings
Manage your personal profile, notification preferences, and sound settings.
Settings Available:
- Personal information and profile details
- Notification sound preferences
- Chat sync settings (enable/disable chat synchronization)
- Language preferences
- Default sound settings for different modules
Chat Sync: You can enable or disable automatic chat synchronization from connected channels into your conversation. This setting is available in Profile Settings.